
Ingredienti
Method
Pattern Instructions
- Materials and tools prepared for this project.
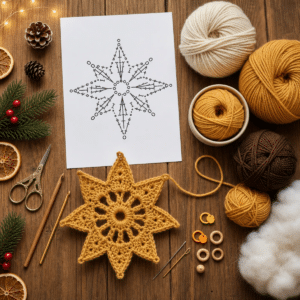
- Row 1: Create the Magic Ring
- Form a magic ring (AM) and work 16 single crochets (sc) inside it. Pull the ring tight to secure your stitches, and close the round with a slip stitch (sl st) in the first single crochet you made. Your work should form a tight circle (16 sts).
- Row 2: Forming the Arches
- Chain 1 (ch), then work 1 sc into the next stitch, chain 5 (cat), skip 1 stitch . Repeat this pattern around to create eight arch spaces. Close the round with a sl st in the first chain (8 arches).
- Row 3: Creating the Groups
- Join with a sl st to the first arch. Inside each arch, work the following: 3 double crochets (dc), 3 chains (cat), 3 more double crochets, and 1 chain. Repeat this in all eight arches. Close the round with a sl st (8 groups).
- Row 4: Expanding the Texture
- Slip stitch to the first space created by 3 chains. In this space, work 2 dc, chain 3, then 2 dc. Skip 1 chain space and work 1 single crochet into the next space followed by 2 chains. Repeat this sequence throughout all eight groups and close with a sl st.
- Row 5: Building the Points
- Slip stitch to the first space created by 3 chains. In this space, work 3 dc, 3 chains, and another 3 dc. Chain 2, then work 1 sc into the side space of the previous chain, chain 2, and repeat for the next side space. Complete in all eight groups and secure with a sl st.
- Row 6: Forming the Triangular Points
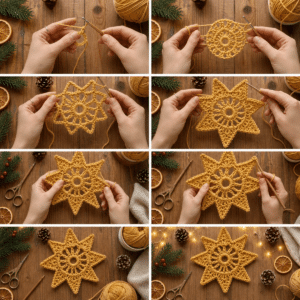
- Slip stitch to the first central space of 3 chains, then in this space, work 3 dc, chain 2, 3 dc, and 3 chains. Work 1 sc in the first side space of 2 chains, followed by 3 chains, and another sc in the second side space. Repeat around all eight groups.
- Row 7: Defining the Pico Edges
- Slip stitch to the first central space of 2 chains. In this space, work 2 dc, chain 2, 2 dc, followed by 3 chains. Work an sc in each side arch for three total spaces, chaining between each sc. Continue this repeating pattern in all groups to establish points.
- Row 8: Finalizing the Points
- Slip stitch to the first central space of 2 chains. In this space, work 1 dc, 3 chains, and another dc. Follow with 4 chains and a single crochet in the first side arch, repeating this throughout each of the eight groups, finishing with a slip stitch to close.
- Step 9: Shape the Star
- Gently spread the star on a flat surface, identifying the eight triangular points. Adjust the points evenly and ensure the central hole remains round. Check that all decorative holes distribute uniformly to create an elegant finish.
- Step 10: Blocking the Star
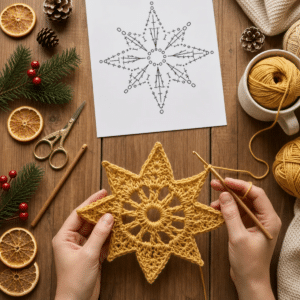
- Lightly dampen the star with clean water and lay it on a blocking mat. Pin down each of the eight points with pins, pulling gently to expand them. Maintain the center as circular, making sure the points are symmetrical for a visually balanced appearance.
- Step 11: Finishing Touches
- Once the star is dry, carefully remove the pins. Weave in all ends neatly from the back to finalize your STELLA NATALIZIA A OTTO PUNTE ALL’UNCINETTO ⭐✨. Make sure the edges are smooth and adjust the points gently with your fingers to ensure they sit correctly.
Note
Gauge and sizing: Gauge & Sizing Notes Don't skip the gauge swatch! For your STELLA NATALIZIA A OTTO PUNTE ALL'UNCINETTO ⭐✨, checking your tension is crucial to ensure the star turns out beautifully and maintains its intended size. A general guideline is to aim for a crochet gauge that matches the fabric's density, roughly measuring 4x4 inches (10x10 cm) . If you want a larger star, increase your starting chain by multiples of 6 + 2 to accommodate your size preference. Conversely, if your swatch is smaller than needed, consider using a larger hook size to achieve your desired tension. Crafting with confidence starts with proper sizing!
Tips: Expert Tips for Crocheting Your Star - Maintain Uniform Tension: Consistent tension throughout your work is key. It helps create beautifully defined stitches and keeps your star's shape balanced. - Count Carefully: Regularly check your stitch count as you work through each row to avoid losing track, which can lead to uneven points on your STELLA NATALIZIA A OTTO PUNTE ALL’UNCINETTO ⭐✨ . - Block for Symmetry: Don't skip blocking! It allows your star to hold its shape perfectly and enhances overall symmetry. Remember to pin each point evenly. - Check Each Stitch: After finishing each section, visually inspect for any missed stitches or tight chains. This prevents potential mistakes from affecting your final design. - Practice on a Sample: Before jumping into the main project, try a small swatch. This helps verify your stitch counts and gauge against the instructions for a delightful outcome.
Care instructions: How to Wash and Care for Your Stella Natalizia Machine Washing: Set your washing machine to a gentle cycle using cold water to avoid felting or pilling your STELLA NATALIZIA A OTTO PUNTE ALL’UNCINETTO ⭐✨ . Hand Washing: If preferred, hand wash your star in cold water with a mild detergent. Gently agitate your star, avoiding twisting or wringing. Drying/Blocking: After washing, lay your star flat on a clean towel and reshape it to maintain the points. Allow it to air dry completely for the best results. Storage: Store your star in a cool, dry place, away from direct sunlight, to keep its vibrant golden color fresh and beautiful.