
Ingredienti
Method
Pattern Instructions
- Materials and tools prepared for this project.
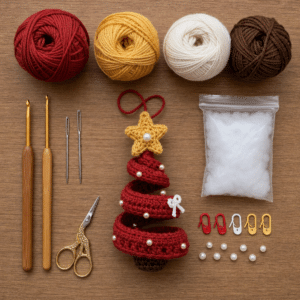
- Row 1: Foundation Chain
- Avviare 61 cat e lavorare 60 mb dalla seconda cat. Your piece should lay flat and be approximately 60 stitches wide, creating a sturdy foundation for your spiral tree. Remember, this row sets the base for the charming Alberello di Natale Rosso a Spirale ! (60 mb)
- Row 2: Increase Stitches
- Iniziare con 1 cat, voltare, e lavorare 2 mb in ogni m. This step will nearly double the stitches, making your fabric fuller and starting to create the spiral effect. Continue until you complete the row, ensuring the count is right. Your work should feel thicker now. (120 mb)
- Row 3: Double Half Trebles
- Chiudere con 1 cat, voltare, e lavorare 2 mma in ogni m. This row adds lovely texture to the Alberello di Natale Rosso a Spirale , enhancing its depth. Your project will feel even more substantial as you complete this round! (240 mma)
- Row 4: Single Crochets
- Concludere con 1 cat, voltare, e lavorare 1 mb in ogni m. This step will standardize your stitches again and prepare the work to begin curling into that delightful spiral shape. By now, your piece should start to cup or curl slightly, hinting at the final form. (240 mb)
- Step 2: Shaping the Spiral
- Tieni un’estremità della striscia come punta superiore e avvolgi la striscia formando circa 5 giri discendenti. Leave the upper coils tight and gradually widen the lower ones. The twisting should naturally create a conical shape; secure it with small hidden stitches.
- Step 3: Central Support
- Inserire un filo centrale resistente per sostenere l’alberello. This wire will help maintain the shape of your Alberello di Natale Rosso a Spirale and provide stability. Ensure the wire is centered as you continue shaping the curves of your tree.
- Round 1: Star Creation
- Inizia il tuo progetto della stella: nell’AM lavorare 10 mb e chiudere con 1 mbss. This initial round creates the foundation of your stunning golden star, adding a festive touch to the top of your tree! (10 mb)
- Round 2: Star Points
- Ripeti 5 volte [1 mbss nella m successiva, 4 cat, 1 mb nella seconda cat, 1 mma nella terza, 1 ma nella quarta, 1 mbss nella m successiva]. These charming points will form the distinctive star shape above your Alberello di Natale Rosso a Spirale . Leave a long tail for sewing later!
- Step 4: Center Bead
- Cucire una perlina avorio al centro della stella. This small touch will enhance your star's beauty, making it a focal point on the tree. Position the star securely atop the peak of your spiraled tree for a lovely finish.
- Step 5: Decorative Bows
- Avviare 13 cat per ogni fiocchetto, lavorando 12 mb dalla seconda cat. This step will create the cute cream ribbons that add a whimsical touch to your Alberello di Natale Rosso a Spirale . Be sure to complete two identical bows.
- Row 2 & 3: Bow Structure
- R2 e R3: 1 cat, voltare, e lavorare 12 mb. This will form the body of your bows. Keep your stitches consistent as these decorative accents will bring your tree to life when attached! (12 mb each row)
- Step 6: Bow Assembly
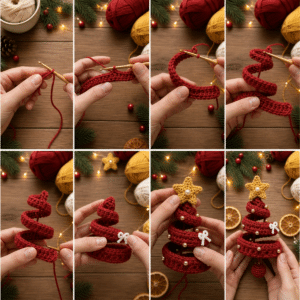
- Chiudere il rettangolo ad anello cucendo i lati corti e stringere il centro con alcune giri di filato panna. This creates a stunning bow shape that will beautifully contrast the ruby red tree. Repeat for the second bow.
- Round 1: Bottom Ball
- G1: nell’AM lavorare 6 mb (6 mb). This round will form the basis of the lower ball of your Alberello di Natale Rosso a Spirale , giving it extra definition and body as the foundation piece.
- Round 2: Increasing
- G2: lavorare 2 mb in ogni m. You will start to build up the ball's size, rounding it out nicely. Ensure your stitches remain tight and consistent for the best shape. (12 mb)
- Round 3: Shape Formation
- G3: rip [1 mb, 2 mb nella m successiva] per 6 volte. This increases the round progressively, ensuring that your ball maintains its definition while also integrating smoothly with the spiral structure. (18 mb)
- Rounds 4-6: Solidify the Ball
- G4-G6: lavorare 18 mb. This step helps round off your ball, building a solid base for the Alberello di Natale Rosso a Spirale . Your ball should feel plush and fuller now. (18 mb each round)
- Round 7: Decreasing
- G7: rip [1 mb, 2 mb chiuse insieme] per 6 volte. This round will gradually decrease your ball’s size, shaping it elegantly. Insert a small amount of stuffing after this round for added dimension. (12 mb)
- Round 8: Finalizing the Ball
- Lavorare 6 diminuzioni per chiudere. This is the final step in shaping the bottom piece of your tree, ensuring it rounds out nicely before being attached to the structure. Close off and hide your tail. (6 mb)
- Step 7: Attaching the Ball
- Fissare la pallina sotto il centro della spirale. Position it securely to provide a proper base for your Alberello di Natale Rosso a Spirale . Ensure it’s stable and well-attached.
- Step 8: Golden Beads
- Preparare piccole perline metalliche dorate e distribuirle lungo le curve della spirale. This detail enhances the festive feel of your Alberello di Natale Rosso a Spirale . Secure each bead carefully for a balanced look.
- Step 9: Upper Cord
- Avviare 30 cat, chiudere ad anello con 1 mbss. This cord will serve as a lovely finishing touch at the top of your tree. Attach securely behind the star for an added festive flair.
- Step 10: Final Assembly
- Controllare che la spirale formi una sagoma conica. Sistemare i cinque giri dal più piccolo al più grande, attaccare i fiocchetti sul davanti. Make sure everything is proportionate and well-placed to complete your Alberello di Natale Rosso a Spirale !
- Step 11: Ending Touches
- Nascondere tutte le estremità del filato e appendere l’alberello. Adjust the spiral gently to finalize your festive creation. Enjoy showcasing your beautiful work this holiday season!

Note
Gauge and sizing: Gauge & Sizing Notes Don't skip the gauge swatch! Checking your tension is essential for crafting the perfect Alberello di Natale Rosso a Spirale con Stella Dorata . A general guideline for gauge is to aim for 4x4 inches (10x10 cm) to establish how your stitches come together. If you'd like your tree to stand taller, consider increasing your starting chain in multiples of 6 + 1 . Conversely, if your swatch is too small, you might want to try using a larger hook size or adjusting your stitch tension. Remember, each adjustment will help you achieve that adorable, festive spiral tree just right for your holiday decor!
Tips: Expert Tips for ALBERELLO DI NATALE ROSSO A SPIRALE - Maintain Tension: Ensure your stitches are consistently tight; uneven tension can lead to a misshapen spiral tree and affect the overall aesthetics. - Count Carefully: Regularly count your stitches, especially during increases and decreases, to avoid losing track and creating gaps in your spiral design. - Secure Ends: Always weave in your yarn tails properly at the end. This secures your work and prevents unraveling, making your Alberello di Natale Rosso a Spirale look polished and complete. - Stabilize the Shape: Remember to insert the central support wire securely to maintain the conical shape of your tree; it’s essential for stabilizing the structure. - Test Fit Decorations: Before securing beads or bows, arrange them to visualize the final look; this helps ensure a balanced and charming placement on your beautiful tree.
Care instructions: How to Wash and Care for Your Alberello di Natale Rosso a Spirale Machine Washing: Use cold water and a gentle cycle to avoid agitation, which can cause felting or pilling. Keep the Alberello di Natale Rosso a Spirale looking fresh and vibrant with minimal wear. Hand Washing: For extra care, soak in lukewarm water with mild detergent. Gently swish without rubbing to preserve its spiral shape and embellishments. Drying/Blocking: Lay flat on a clean towel to dry completely. Avoid hanging, as this may distort the shape of your beautiful tree; ensure it maintains its conical form. Storage: Store in a cool, dry place, away from direct sunlight. This will help prevent fading and retain the charming colors of your festive Alberello di Natale Rosso a Spirale .