Easter morning sparkles with joy as I think back to our family tradition of crafting playful pancakes, where laughter and creativity come together in the kitchen. This year, I’m excited to share my delightfully whimsical Easter Bunny Pancakes that not only bring smiles but are incredibly easy to make! These fluffy pancakes are perfect for a fun breakfast, making them a fantastic choice for your holiday brunch. Imagine serving up a plate where kids and adults alike can indulge in a light, fluffy treat dressed up as adorable bunnies, all while bonding over the cooking process. Beyond the joy of cooking, these pancakes are also a wonderful way to add a touch of magic to your Easter celebrations. Ready to hop into the kitchen and create some culinary cheer? Let’s dive in!
Why Are These Pancakes So Fun?
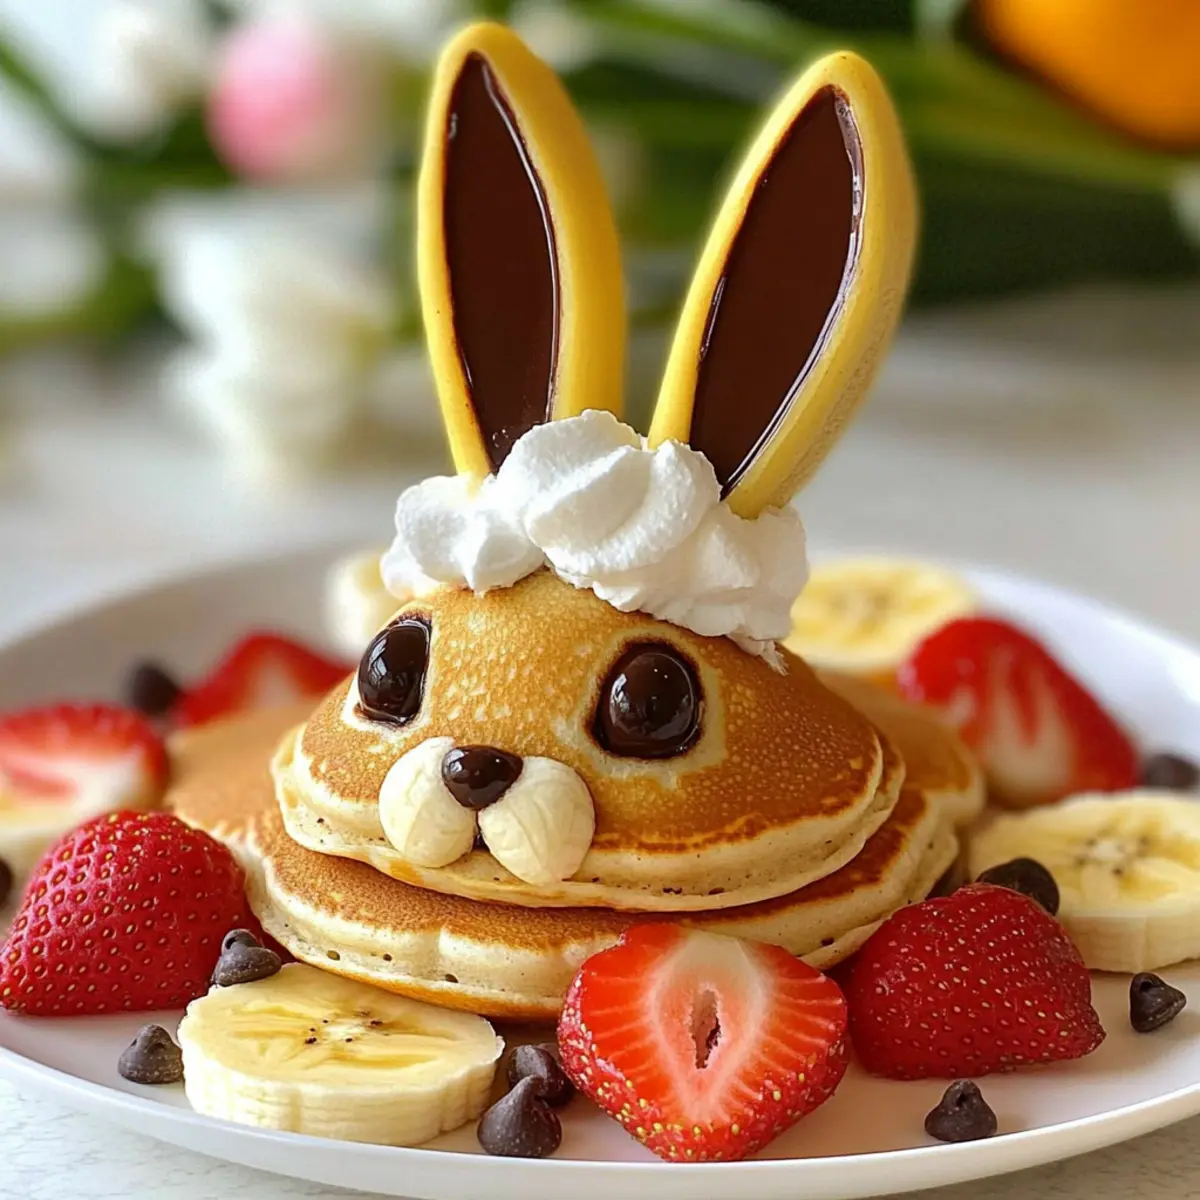
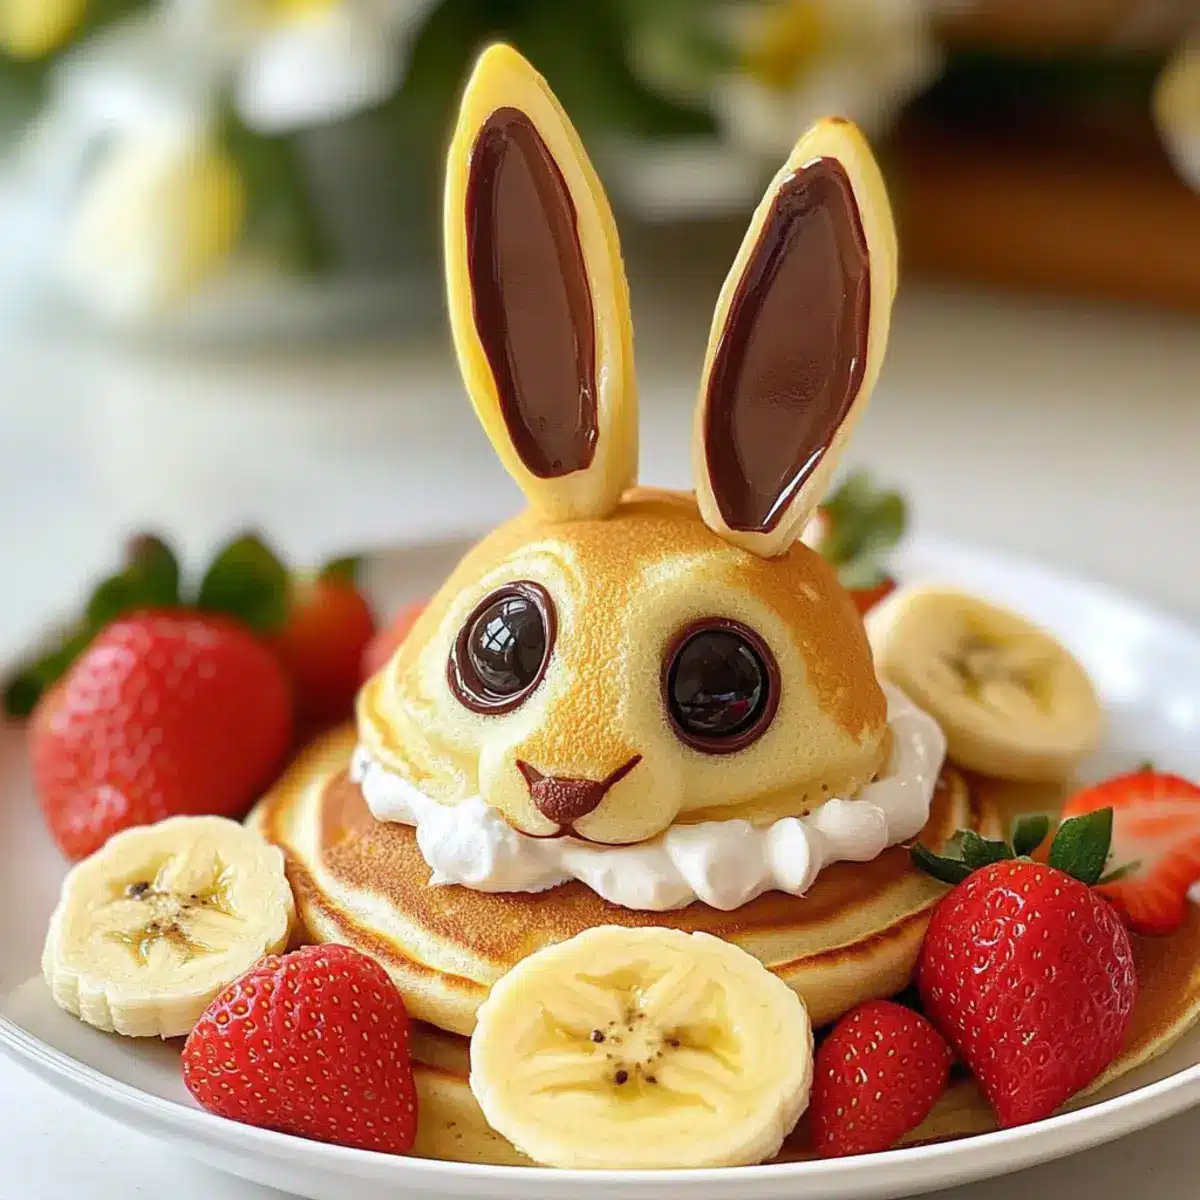
Whimsy at the breakfast table: These adorable Easter Bunny Pancakes transform a simple meal into a delightful experience for the whole family.
Versatile toppings: Have fun decorating! Banana slices, strawberries, or chocolate chips can customize each bunny pancake to your liking.
Easy to assemble: With a straightforward recipe, you’ll find that even novice cooks can whip these up, fostering creativity in the kitchen.
Memorable moments: Making these pancakes becomes a cherished family tradition, perfect for sparking laughter and bonding on Easter morning.
Time-saving option: In under 30 minutes, create a magical brunch that impresses and delights, making it perfect for busy holiday mornings.
Easter Bunny Pancakes Ingredients
For the Pancake Batter
- Flour – This is the base of your pancakes; substitute gluten-free flour for a delightful gluten-free option.
- Baking Powder – This helps your pancakes rise and achieve a fluffy texture; always check for freshness!
- Sugar – A touch of sweetness to complement the toppings; you can use coconut sugar for a healthier alternative.
- Salt – A pinch enhances the overall flavor; don’t skip it!
- Milk – Adds moisture and softness; use almond milk for a dairy-free version.
- Eggs – Binds the ingredients together; a flax egg works well for a vegan option.
- Vanilla Extract – A hint of flavor that brings warmth; skip this if you prefer a plain pancake.
For the Decorations
- Chocolate Chips – Perfect for cute, beady eyes; mini chocolate chips add an extra charm!
- Whipped Cream – This plush topping mimics bunny fur; opt for dairy-free whipped cream if needed.
- Chocolate Syrup or Melted Chocolate – Great for decorating facial features; any chocolate sauce will do!
- Banana Slices – Fresh and fruity, they add vibrancy and nutrition; feel free to use any favorite fruit.
- Strawberries – Juicy pops of flavor that enhance your pancake presentation; blueberries or raspberries work just as wonderfully!
These Easter Bunny Pancakes are not just a delightful treat, but they’re also a fun and engaging way to bring the family together for a memorable breakfast celebration!
Step‑by‑Step Instructions for Easter Bunny Pancakes
Step 1: Prepare the Pancake Batter
In a large mixing bowl, combine flour, baking powder, sugar, and salt. In a separate bowl, whisk together milk, eggs, and vanilla extract until smooth. Gradually pour the wet ingredients into the dry mixture, stirring gently until just combined. Let the batter rest for about 5 minutes while you heat your skillet over medium heat, ensuring it’s hot enough for golden-brown pancakes.
Step 2: Cook the Bunny Face Pancake
Lightly grease your skillet with a bit of butter or cooking spray. Pour in about 1 cup of pancake batter and spread it into a large round shape for the bunny’s face. Cook for approximately 3-4 minutes or until bubbles form on the surface and the edges look set. Carefully flip the pancake and cook for another 2-3 minutes until it turns golden brown and fluffy.
Step 3: Shape the Bunny Ears
Using the remaining batter, pour two smaller oval shapes for the bunny’s ears on the skillet. Each should take about 2-3 minutes to cook, just like the face pancake. Flip them carefully to achieve a golden color on both sides, ensuring they are firm and fluffy. Once cooked, set these aside next to the face pancake on a warm plate.
Step 4: Add the Bunny Eyes
Take the large round pancake that forms the bunny’s face and insert two mini chocolate chips into the center for the eyes. Press them in gently to ensure they stay secure. This adds a sweet touch to your Easter Bunny Pancakes that kids will absolutely love, making the face come to life!
Step 5: Decorate with Melted Chocolate
Melt some chocolate syrup in the microwave for 10-15 seconds to create a smooth consistency. Using a toothpick or a small squeeze bottle, drizzle the melted chocolate onto the pancake to create a cute bunny nose and mouth. This detail adds character to your Easter Bunny Pancakes and makes them truly special.
Step 6: Create the Bunny’s Fur
Top the bunny face pancake with an ample dollop of whipped cream, mimicking the soft fur of your adorable creation. Feel free to use dairy-free whipped cream if needed. Spread it generously to cover the pancake while keeping the chocolate chip eyes visible, creating a playful and fluffy effect.
Step 7: Finish with Fresh Fruit
Surround your Easter Bunny Pancakes with colorful banana slices and juicy strawberries, adding both flavor and visual appeal to your brunch plate. This not only complements the sweetness of the pancakes but also brings a fresh twist to the festive presentation, making your breakfast even more delightful.

What to Serve with Easter Bunny Pancakes
Imagine the delightful spread you can create to complement these playful pancakes, transforming your brunch into a festive feast.
- Fresh Fruit Salad: A vibrant mix of seasonal fruits adds brightness and balances the sweetness of the pancakes.
- Maple Syrup: Classic and comforting, maple syrup offers a rich flavor that pairs beautifully with fluffy pancake goodness.
- Crispy Bacon: The savory crunch of bacon creates a perfect textural contrast to the tender pancakes, enhancing the overall meal.
- Yogurt Parfait: Layered yogurt with granola and berries provides creaminess and crunch, making for a refreshing side option.
- Scrambled Eggs: Creamy, fluffy scrambled eggs add protein and round out the meal, making it hearty and satisfying.
- Coconut Whipped Cream: Elevate your dessert with coconut whipped cream, offering a tropical twist that pairs perfectly with bunny-themed fun.
These accompaniments ensure your Easter Bunny Pancakes are celebrated with flavors and textures that create lasting memories around the breakfast table.
Easter Bunny Pancakes Variations
Feel free to let your creativity shine by customizing these adorable pancakes with delightful swaps and tweaks!
- Gluten-Free: Use a gluten-free flour blend in your batter for a fluffy gluten-free option that everyone can enjoy.
- Flavor Boost: Incorporate a dash of vanilla extract or a sprinkle of cinnamon into the batter for a warm, inviting twist.
- Cute Animal Shapes: Transform your pancakes into different critters like lambs or chicks, simply by modifying the shape—fun for any occasion!
- Fun Toppings: Sprinkle some shredded coconut on top to mimic bunny fur for an added textural surprise and delicious flavor.
- Fresh Fruit Swaps: Switch out banana and strawberries for blueberries or raspberries, adding a colorful burst and a different vibe to your dish.
- Extra Creaminess: Try almond milk or oat milk in place of regular milk for a different creamy dimension. It brings a subtle sweetness that pairs nicely with the toppings.
- Chocolate Lovers: Drizzle additional melted chocolate over the pancakes for a luscious, indulgent touch that takes them to the next level.
- Spicy Kick: Add a pinch of cayenne or chili powder to the batter if you’re feeling adventurous—it’ll give your pancakes an unexpected yet delightful warmth.
These fun variations ensure your Easter Bunny Pancakes remain a delightful centerpiece at your brunch table, no matter the dietary needs or flavor preferences of your family and friends.
Make Ahead Options
These Easter Bunny Pancakes are perfect for meal prep enthusiasts looking to save time on a busy holiday morning! You can prepare the pancake batter up to 24 hours in advance; simply mix your dry and wet ingredients separately, then combine when you’re ready to cook. To maintain quality, refrigerate the batter in an airtight container. You can also cook the pancakes ahead of time and store them in the refrigerator for up to 3 days. Just reheat in a microwave or toaster oven before adding your fun decorations. When you’re ready to serve, simply assemble your bunny faces and enjoy a delightful breakfast with minimal effort!
Expert Tips for Easter Bunny Pancakes
-
Batter Consistency: Make sure your pancake batter is not too thick or too runny; a thick batter can lead to uneven cooking, while a runny batter may spread too thin.
-
Heat Management: Cook pancakes on medium heat to ensure they cook evenly without burning. If the pan is too hot, they might brown too quickly on the outside while remaining raw inside.
-
Pancake Cooking: Look out for bubbles forming on the surface of the pancake; this indicates it’s ready to flip. Check the bottom for a golden-brown finish before flipping your bunny’s face.
-
Creative Toppings: Don’t hesitate to mix and match your toppings! You can use other fruits, such as blueberries or peaches, for different bunnies or incorporate sprinkles for an extra festive touch.
-
Storage Tips: If you have leftovers, store the pancakes in an airtight container in the fridge for up to three days. Reheat them in the microwave or toaster oven for the best results.
Each of these tips ensures your Easter Bunny Pancakes become a delightful centerpiece for your holiday brunch!
Storage Tips for Easter Bunny Pancakes
- Room Temperature: Serve your pancakes warm and enjoy them fresh for the best flavor and texture; if left out, consume within 2 hours to ensure quality.
- Fridge: Keep leftover pancakes in an airtight container for up to 3 days; they can be enjoyed cold or reheated for breakfast any day of the week!
- Freezer: For longer storage, freeze pancakes in a single layer on a baking sheet, then transfer to an airtight container. They will stay fresh for up to 2 months.
- Reheating: Reheat pancakes in the microwave for 20-30 seconds or in a toaster oven until warm; add a drizzle of syrup or fresh fruit to revitalize the flavors of your Easter Bunny Pancakes!
Easter Bunny Pancakes Recipe FAQs
How do I choose ripe bananas for the decoration?
Absolutely! When selecting bananas, look for those that are bright yellow with minimal brown spots; this indicates they’re sweet and ripe. If you prefer a firmer texture, choose bananas that are still slightly green at the tips. Avoid any with dark spots or large blemishes, as these may be overripe.
How can I store leftover Easter Bunny Pancakes?
Very! To keep your pancakes fresh, store them in an airtight container in the refrigerator for up to 3 days. If you’d like to enjoy them later, simply reheat in the microwave for 20-30 seconds or pop them in a toaster oven until warmed through.
Can I freeze Easter Bunny Pancakes?
Of course! To freeze pancakes, first place them in a single layer on a baking sheet and freeze until firm, about 1-2 hours. Then, transfer the pancakes to an airtight container or freezer bag, separating layers with parchment paper, and store them in the freezer for up to 3 months. When you’re ready to enjoy them, reheat directly from frozen in the microwave for about 40-60 seconds or in a toaster oven.
What should I do if my pancakes are too thick?
Very common! If your pancake batter is too thick, simply add a tablespoon of milk at a time, mixing gently, until you achieve a pourable consistency. Remember, slightly thicker batter results in fluffier pancakes, but you want it to flow easily when poured onto the skillet.
What modifications can I make for allergies or dietary restrictions?
Absolutely! For gluten-free pancakes, substitute regular flour with a gluten-free flour blend. To make dairy-free pancakes, choose almond or oat milk and opt for dairy-free whipped cream. For egg-free options, a flax egg (1 tablespoon ground flaxseed mixed with 2.5 tablespoons water, rested for 5 minutes) is an excellent substitute. Always read labels when choosing ingredients to ensure they fit your dietary needs!
How long can I keep the decorated pancakes before serving?
While you might be excited to put the finishing touches right away, it’s best to serve the decorated Easter Bunny Pancakes immediately. If needed, keep them warm in a low oven (about 200°F) for up to 30 minutes. Avoid decorating too early, as the whipped cream may start to deflate and the fruit may lose its freshness.
These Easter Bunny Pancakes Recipe FAQs are designed to help you ensure your festive breakfast is a complete success!

Easter Bunny Pancakes That Bring Smiles to Your Brunch Table
Ingredients
Equipment
Method
- In a large mixing bowl, combine flour, baking powder, sugar, and salt.
- In a separate bowl, whisk together milk, eggs, and vanilla extract until smooth.
- Gradually pour the wet ingredients into the dry mixture, stirring gently until just combined.
- Let the batter rest for about 5 minutes while you heat your skillet over medium heat.
- Lightly grease your skillet, pour in about 1 cup of pancake batter and shape it for the bunny's face.
- Cook for approximately 3-4 minutes until bubbles form, then flip and cook for another 2-3 minutes.
- Pour two smaller ovals for the bunny's ears and cook them just like the face pancake.
- Insert mini chocolate chips for the bunny eyes on the large pancake.
- Melt chocolate syrup in the microwave and drizzle it for a bunny nose and mouth.
- Top with whipped cream for bunny fur, ensuring the chocolate chip eyes are visible.
- Surround with banana slices and strawberries for colorful presentation.
Leave a Reply