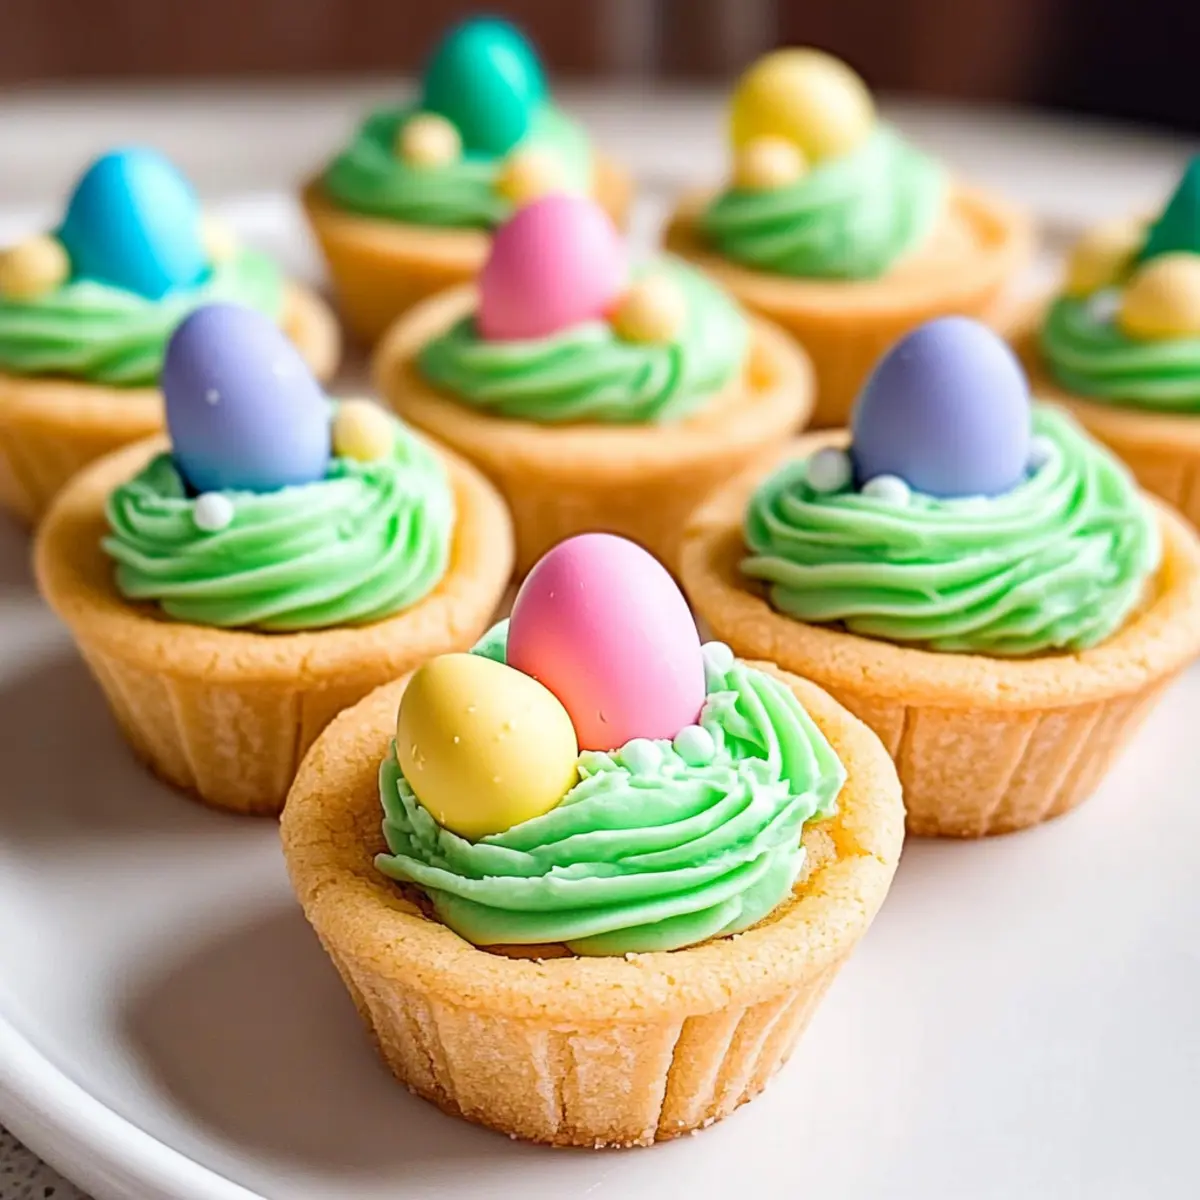
In a moment that feels like stepping into a whimsical storybook, I discovered the joy of creating Easter Basket Sugar Cookie Cups—a recipe that perfectly combines fun and indulgence. These cheerful treats not only embody the spirit of Easter but also make for a delightful family activity. Picture soft sugar cookie cups cradling creamy vanilla buttercream and colorful chocolate eggs, transforming any celebration into a festive affair. What I love most about these cookie cups is their quick prep time, allowing you to whip them up effortlessly, and the creative flexibility they offer—let the kids go wild with their decorations! So, whether you’re planning an Easter brunch or just seeking a sweet project to brighten your day, these cookie cups will surely steal the show. Are you ready to add a touch of whimsy to your baking this season?
Why Are These Cookie Cups So Special?
Delightfully Fun: Each Easter Basket Sugar Cookie Cup is a canvas for creativity, letting you and your kids decorate them with colors and toppings that spark joy.
Easy to Make: With just a few simple ingredients like pre-made cookie dough and buttercream, these cups are a breeze to whip up—perfect for busy bakers wanting a festive treat!
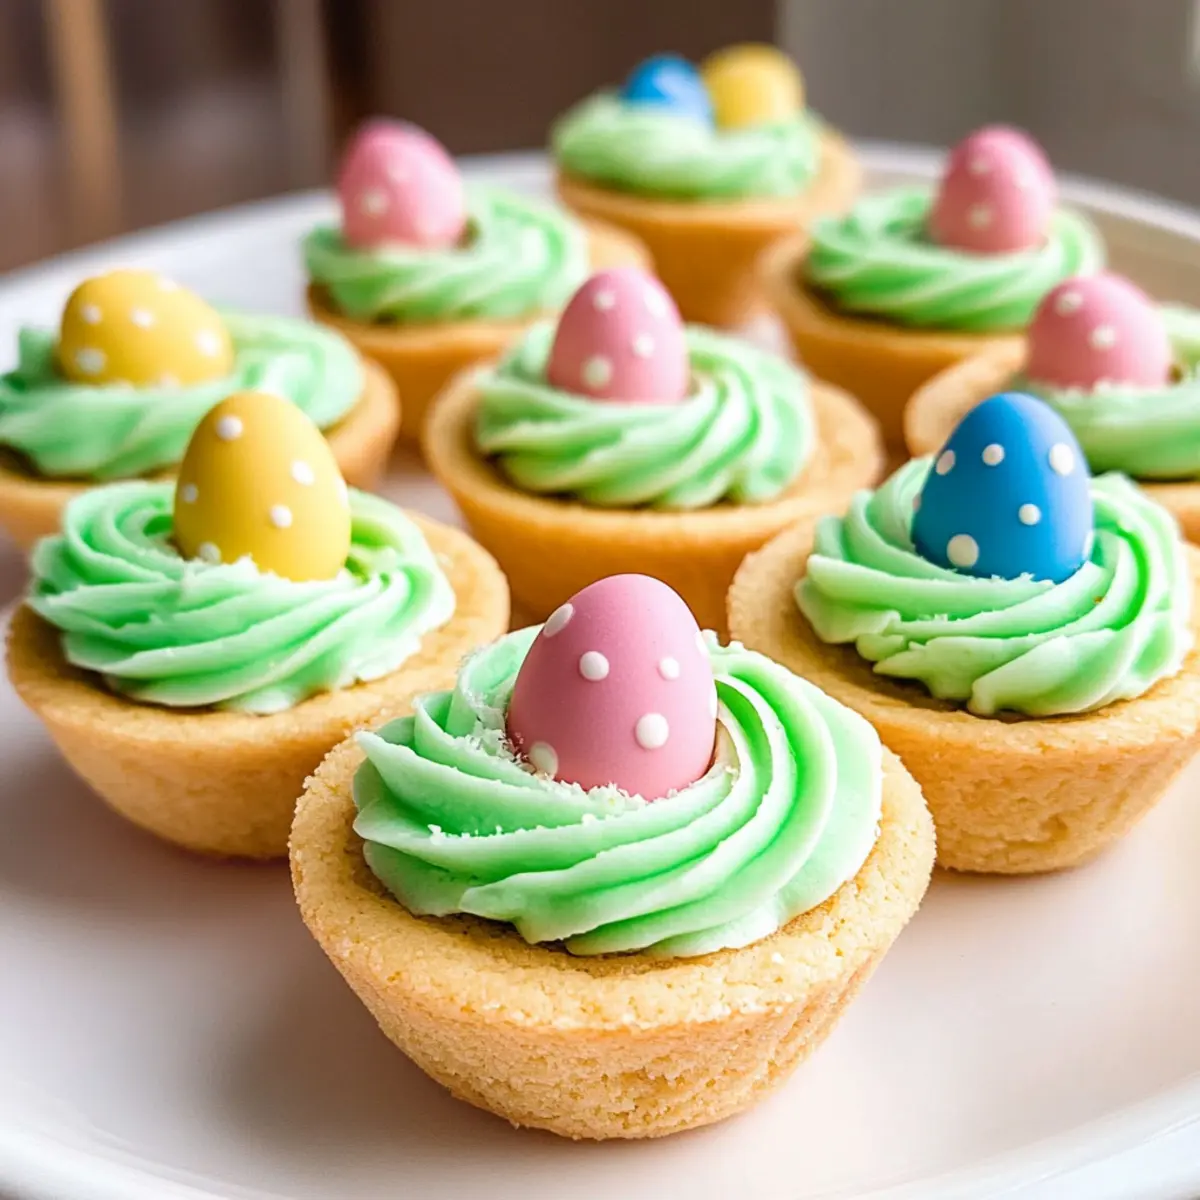
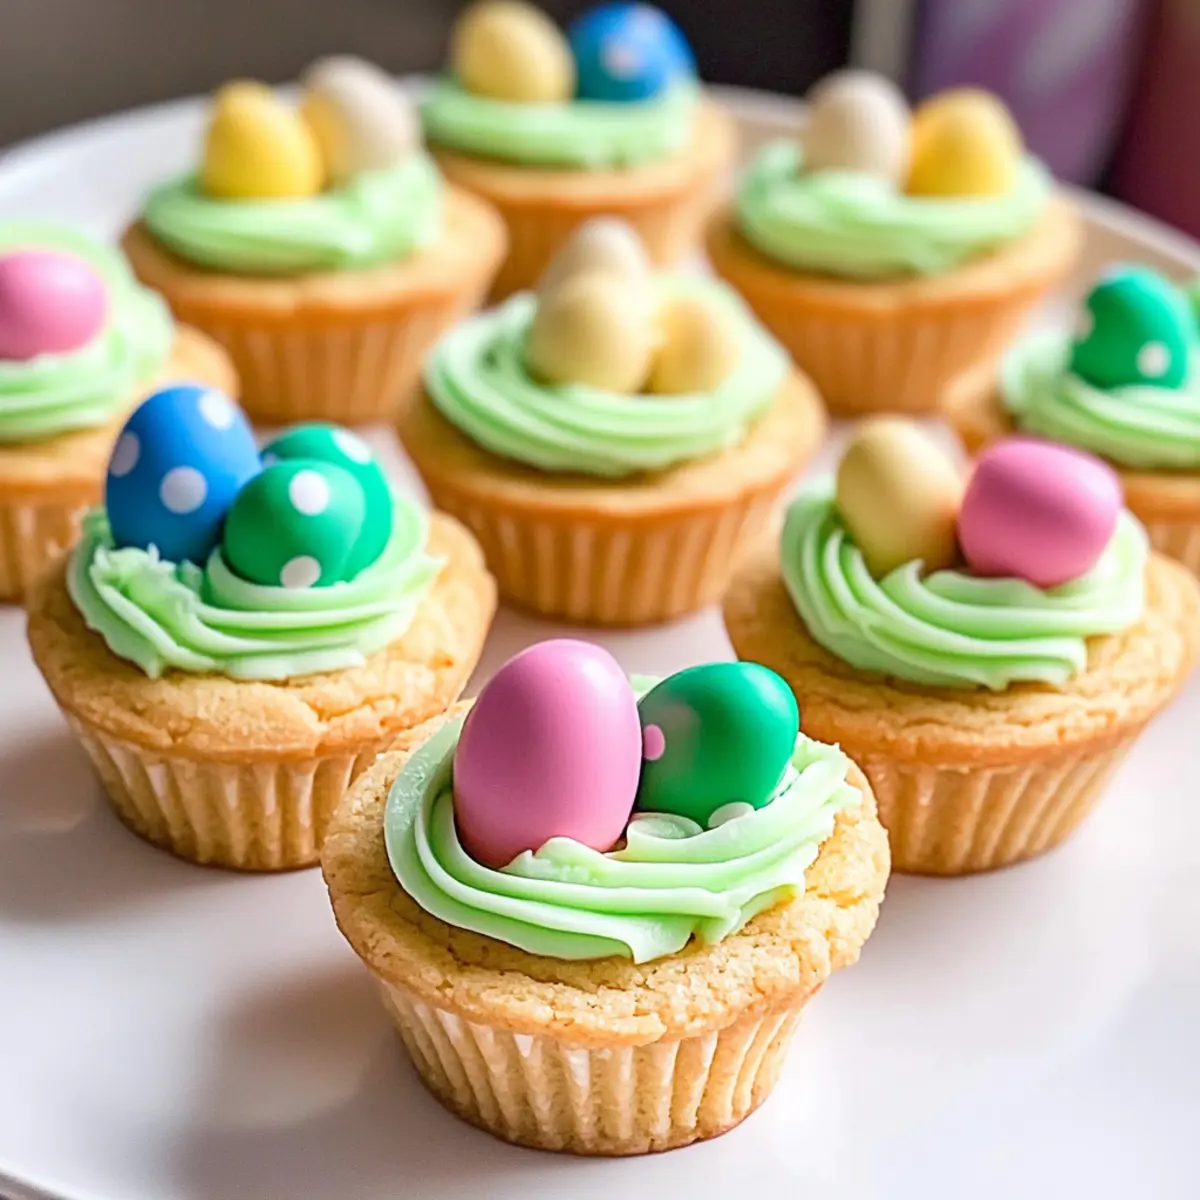
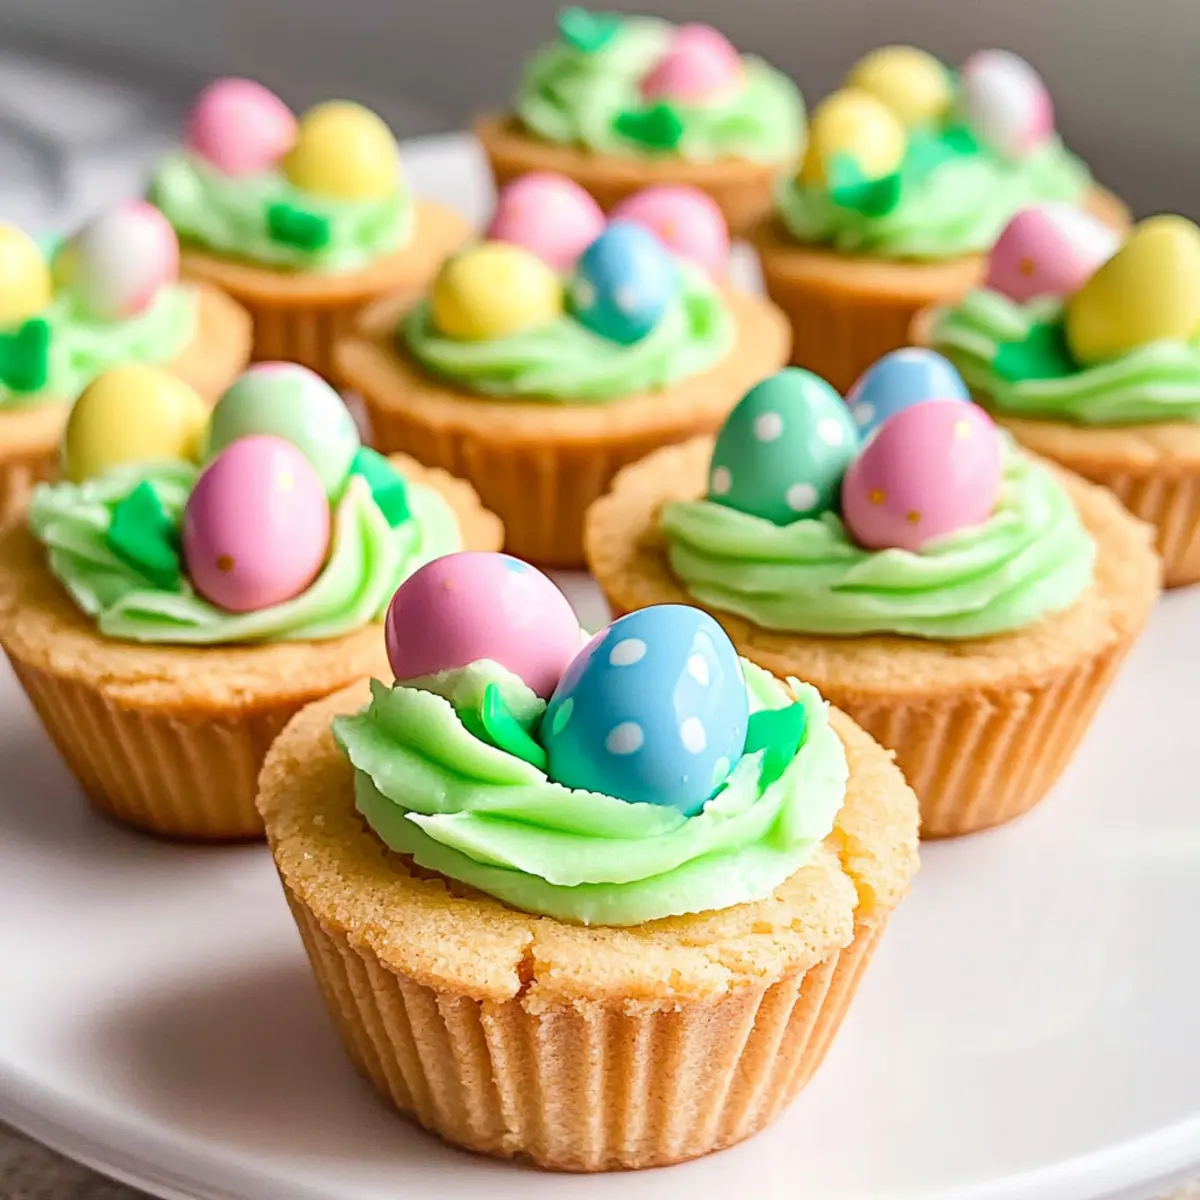
Visually Appealing: Their whimsical design featuring fluffy frosting and colorful chocolate eggs will surely impress at any gathering, making them a hit for Easter brunch or school parties.
Versatile Treat: Feeling adventurous? Mix and match the decorations using various candies, or even try different frosting colors to customize your cookie cups for any occasion.
Quick Cleanup: Thanks to using muffin tins, there’s minimal mess left behind, allowing you to enjoy more time with family and friends—especially after these cookie cups have vanished!
You’ll find more delightful recipes like the Christmas Sugar Cookie or the fun Strawberry Cheesecake Cookies to keep the celebrations going.
Easter Basket Sugar Cookie Cups Ingredients
• Create these delightful treats with fresh ingredients!
For the Cookie Cups
- Pillsbury Sugar Cookie Dough – A sweet and convenient base for your cookie cups; choose the flat package for easy portioning.
For the Buttercream Frosting
- Salted Butter – Adds richness and flavor; unsalted butter can be substituted if you’re adjusting the salt content.
- Powdered Sugar – Sweetens and thickens your frosting; it’s essential for achieving the right consistency.
- Heavy Whipping Cream – Creates a light, fluffy texture for the frosting; avoid substitutions for the best results.
- Vanilla Extract – Perfectly enhances the flavor; imitation vanilla works in a pinch but lacks depth.
For the Decoration
- Green Food Coloring – Gives your frosting a lovely grass-like appearance in the basket; feel free to use alternative colors for a colorful twist.
- Hershey’s Chocolate Eggs – Add that festive crunch and vibrant color on top; you can also use other candies like jelly beans or Cadbury Mini Eggs as a substitute.
Now, gather your ingredients and let’s get ready to create some whimsical Easter Basket Sugar Cookie Cups that will make your celebration truly special!
Step‑by‑Step Instructions for Easter Basket Sugar Cookie Cups
Step 1: Preheat the Oven
Begin by preheating your oven to 350°F (175°C) and prepare your muffin tins by spraying them with cooking spray to ensure easy release. A non-stick spray works best for this purpose, as it will help the cookie cups come out smoothly after baking.
Step 2: Portion the Cookie Dough
Take your Pillsbury Sugar Cookie Dough and slice it into equal portions, placing each piece into the greased muffin wells. Gently press the dough to cover the base and sides of each well. Bake for about 10-14 minutes, until the edges are lightly browned and the centers look slightly puffy.
Step 3: Form the Basket Shape
Once the cookie cups are baked, remove them from the oven and let them cool for a minute. Using a shot glass or a spice jar, gently press into the center of each cookie cup to create a basket shape. Be careful not to press too hard, as you don’t want to crack the cookie.
Step 4: Cool Completely
After forming the baskets, carefully transfer them to a wire rack to cool completely. It’s essential to allow them to cool fully, as this will help maintain their shape and prevent the frosting from melting when added later.
Step 5: Prepare the Buttercream Frosting
In a mixing bowl, beat together the salted butter until it’s creamy and fluffy. Gradually add in the powdered sugar, mixing well to avoid lumps. Then, incorporate the heavy whipping cream and vanilla extract until you achieve a light and creamy consistency—perfect for the frosting of your Easter Basket Sugar Cookie Cups.
Step 6: Color the Frosting
Once your buttercream frosting is ready, add a few drops of green food coloring to the mixture. Mix until you reach your desired shade of green, resembling grass in your cookie cups. This coloring adds a delightful touch to your Easter-themed treats, making them visually appealing.
Step 7: Frost the Cookie Cups
Using a piping bag fitted with a star tip or a Ziploc bag with a corner snipped, pipe the green buttercream frosting into the cooled cookie cups. Fill them generously to create a fluffy topping that mimics grass, allowing you some freedom to decorate as you go.
Step 8: Decorate with Chocolate Eggs
Finally, to finish off your Easter Basket Sugar Cookie Cups, top each frosted cup with colorful Hershey’s chocolate eggs or any candy of your choice. This playful decoration adds both taste and a festive flair, making your cookie cups a highlight at any Easter celebration.
How to Store and Freeze Easter Basket Sugar Cookie Cups
Room Temperature: Store unfrosted cookie cups in an airtight container at room temperature for up to one week to maintain their softness and flavor.
Fridge: If you’ve already frosted your cookie cups, keep them in the fridge for optimal freshness, consuming them within 3 days for the best taste and texture.
Freezer: You can freeze unfrosted cookie cups for up to 3 months. Wrap each cup tightly in plastic wrap and place them in an airtight container before freezing.
Reheating: For frozen, unfrosted cups, let them thaw at room temperature before decorating. If you wish to enjoy them warm, reheat in the oven at 300°F (150°C) for about 5-7 minutes. Enjoy your Easter Basket Sugar Cookie Cups anytime!
What to Serve with Easter Basket Sugar Cookie Cups
Pair these delightful treats with options that enhance their festive charm and sweetness.
-
Fresh Fruit Salad: The bright, juicy flavors of seasonal fruits balance the sweetness of the cookie cups and add a refreshing touch. Plus, kids love picking out their favorites!
-
Chocolate Milk: A playful drink option that pairs perfectly with the cookie cups, adding a nostalgic twist to your dessert experience—everyone loves chocolate milk!
-
Whipped Cream Dip: Light and airy, this creamy dip offers a lovely contrast to the cookie’s texture. Serve it alongside fresh strawberries or apple slices for a delightful snack.
-
Easter-themed Spritzers: Create a light, fizzy drink using sparkling water mixed with a splash of fruit juice. It’s refreshing and ties in beautifully with the festive theme.
-
Mini Carrot Cupcakes: Offer another sweet treat that echoes the Easter theme. These moist cupcakes provide a touch of spice to complement the cookie cups’ sweetness.
-
Coffee or Espresso: A warm drink works wonders to balance the sugar. The rich flavors of coffee resonate beautifully with the buttercream frosting.
-
Marshmallow Fluff Dip: Light and sweet, this dip pairs well with graham crackers or fruit. It’s an interactive treat that guests will enjoy dipping into!
-
Pistachio Ice Cream: Creamy and nutty, this ice cream adds a unique flavor twist that complements the sugar cookie cups wonderfully while providing that ice cream parlor vibe at your gathering.
These pairings will surely elevate your dessert table and bring joy to your Easter celebration!
Easter Basket Sugar Cookie Cups Variations
Feel free to get creative and make these Easter Basket Sugar Cookie Cups uniquely yours with these delightful twists!
-
Candy Swap: Use jelly beans or Reese’s eggs instead of chocolate eggs for a flavor shift. The colorful mix will also enhance the festive look!
-
Themed Colors: Experiment with frosting colors like pink or blue to match your holiday decor or favorite team colors. Colorful frosting can brighten up any occasion!
-
Nut Butter Cream: For a twist, replace half the butter in the frosting with creamy peanut butter. This adds a rich, nutty flavor that everyone will love!
-
Gluten-Free: Substitute the cookie dough with a gluten-free pre-made variety. It’s a simple change that allows everyone to enjoy these treats!
-
Add Some Crunch: Mix in finely chopped nuts or toffee bits into the cookie dough for a delightful crunch. It adds texture and a deliciously surprising element!
-
Festive Sprinkles: Top your frosting with holiday-themed sprinkles or edible glitter for a whimsical touch. It makes the cookie cups even more fun for kids.
-
Spicy Kick: For the adventurous, add a pinch of cinnamon or pumpkin spice to the batter for a seasonal kick. It adds warmth and depth to the flavors!
-
Cream Cheese Frosting: Swap the buttercream for cream cheese frosting for a tangy richness. It pairs beautifully with the sweetness of the sugar cookie!
These variations not only make these cookies adaptable for any palate or dietary need but also turn baking into an exciting family event. Enjoy experimenting, and if you’re looking for more sweet ideas, check out the delightful Cookie Butter Cheesecake or the whimsical Savory Rosemary Cookies!
Make Ahead Options
These Easter Basket Sugar Cookie Cups are perfect for busy home cooks who want to make the holiday a little easier! You can prepare the cookie cups up to 24 hours in advance by baking them and allowing them to cool completely before storing them in an airtight container at room temperature. The buttercream frosting can also be made ahead and refrigerated for up to 3 days; just remember to let it come to room temperature and re-whip before frosting. When you’re ready to serve, simply fill the cooled cookie cups with the delicious frosting and decorate with chocolate eggs for a delightful treat that’s just as festive and tasty!
Helpful Tricks for Easter Basket Sugar Cookie Cups
Avoid Overbaking: Keep a close eye on your cookie cups; checking them at the 10-minute mark prevents them from becoming hard.
Cooling Time Is Key: Make sure to let your cookie cups cool completely before adding frosting; this prevents melting and messy decorations.
Perfect Press: When forming the basket shape, use gentle pressure to press down the centers of the cookies; too much force can lead to cracks.
Piping Made Easy: If you don’t have a piping bag on hand, a Ziploc bag works great! Just snip a small corner for easy frosting application.
Decorate Creatively: Encourage kids to unleash their creativity with different colored frosting and assorted candy toppings for a personalized touch to each Easter Basket Sugar Cookie Cup.
Easter Basket Sugar Cookie Cups Recipe FAQs
How do I choose the right sugar cookie dough?
Absolutely! For these Easter Basket Sugar Cookie Cups, I recommend using the Pillsbury Sugar Cookie Dough, specifically the flat package for easier portioning. Look for dough that’s fresh and has no dark spots or damage; it should be soft and pliable.
How should I store the cookie cups after baking?
Very good question! Unfrosted cookie cups can be kept in an airtight container at room temperature for up to one week. If you have frosted them, it’s best to refrigerate and enjoy them within three days for optimal flavor and texture.
Can I freeze the cookie cups?
Yes, you can freeze your unfrosted cookie cups! Wrap each cup tightly in plastic wrap and place them in an airtight container to keep them protected. They will last up to three months in the freezer. When you’re ready to enjoy, just let them thaw at room temperature before adding frosting.
What should I do if my cookie cups crack?
Great concern! If you find that your cookie cups crack while pressing down to form the basket shape, you might be pressing too hard. Try using gentle pressure, and if they crack during baking, don’t worry—decorating can still conceal imperfections. Just make sure to keep an eye on the baking time to prevent overbaking.
Are these cookie cups safe for children with allergies?
Another important consideration! These Easter Basket Sugar Cookie Cups contain common allergens like gluten and dairy. If you’re serving them to children with allergies, consider using allergy-friendly sugar cookie dough and substitute dairy-free products for the butter and cream. Always check labels to ensure safety when preparing for guests or family members with dietary restrictions.
Easter Basket Sugar Cookie Cups: Sweet Treats for Everyone
Ingredients
Equipment
Method
- Preheat your oven to 350°F (175°C) and spray muffin tins with cooking spray.
- Portion the cookie dough and press it into the muffin wells, then bake for 10-14 minutes.
- Remove the cookie cups from the oven and press the centers to form basket shapes.
- Allow the cookie cups to cool completely on a wire rack.
- Beat together salted butter, powdered sugar, heavy whipping cream, and vanilla extract until creamy for the frosting.
- Add green food coloring to the buttercream frosting and mix well.
- Pipe the green frosting into the cooled cookie cups.
- Top each frosted cup with colorful Hershey's chocolate eggs.
Leave a Reply