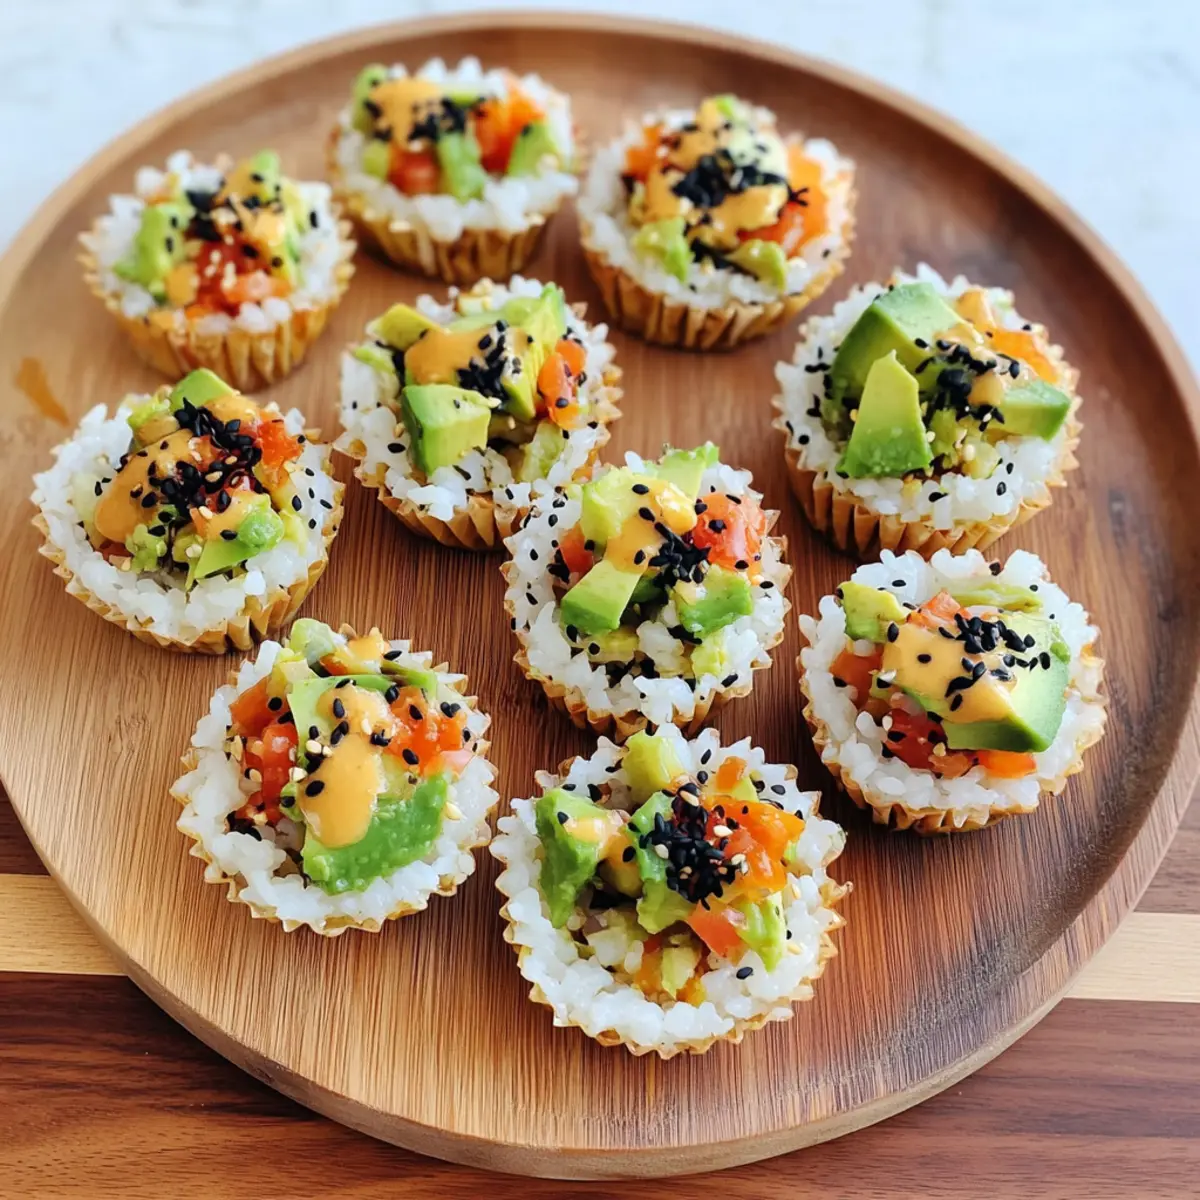
As I stood in my kitchen, an unexpected craving for sushi tickled my taste buds like a gentle breeze on a warm day. That’s when I decided to create these Customizable Sushi Cups with Spicy Mayo. Not only do they capture all those delightful sushi flavors in a fun, bite-sized treat, but they are also incredibly easy to make—no baking required! Perfect as a snack or an impressive appetizer for gatherings, these sushi cups are totally adaptable, inviting you to mix and match your favorite veggies and sauces. Imagine enjoying a bite of perfectly tender sushi rice paired with crisp vegetables and creamy avocado, all crowned with a kick of spicy mayo. Isn’t it time to elevate your snacking game? Let’s dive into this deliciously easy recipe together!

Why are Sushi Cups a Must-Try?
Customizable for everyone: These sushi cups let you choose your favorite veggies and sauces, ensuring a dish that fits all tastes.
No Baking Required: Experience the joy of cooking without the hassle—just assemble and enjoy, making it perfect for busy days.
Crowd-Pleasing Snack: Whether it’s a party or a cozy night in, these cups guarantee delightful smiles from guests and family alike.
Healthy & Light: At only 110 calories per cup, they make for a satisfying yet guilt-free snack option.
Unique Flavor Combo: The blend of tender sushi rice, fresh ingredients, and spicy mayo creates a burst of taste that you’ll adore. Try them alongside my Salmon Sushi Cups or Tot Appetizer Cups for diverse flavor experiences!
Sushi Cups Ingredients
For the Rice Base
• Sushi Rice – Rinse thoroughly before cooking to remove excess starch for perfect texture.
• Water – Ensure a proper ratio (1 cup rice to 1.5 cups water) for the best sushi rice results.
For the Filling
• Chopped Veggies (1/2 cup) – Select fresh options like carrots, cucumber, or bell peppers for a crunchy bite.
• Steamed Mukimame (1/4 cup) – A great source of plant-based protein; regular shelled edamame can be used instead.
• Diced Avocado (1/4 cup) – Choose ripe avocado for creamy texture and rich flavor.
• Sauce (1 tablespoon) – Options like soy sauce or coconut aminos can be used to enhance flavor based on dietary needs.
For the Spicy Mayo
• Mayonnaise (1/4 cup) – This is the base for creamy spicy mayo; vegan mayo is a suitable substitute for a dairy-free version.
• Sriracha Sauce (1 teaspoon) – Adjust the amount for desired heat level in the mayo.
• Honey (1 teaspoon) – Balances the spiciness; agave syrup can replace it for a vegan option.
• Sesame Oil (1/2 teaspoon) – Adds a rich, nutty flavor; optional for those avoiding oil.
For Garnish
• Black Sesame Seeds – Sprinkle for a pop of color and subtle crunch that enhances your sushi cups.
These Sushi Cups are adaptable, making it easy for you to enjoy flavors that you love!
Step‑by‑Step Instructions for Sushi Cups
Step 1: Cook Rice
In a medium pot, combine 1 cup of rinsed sushi rice with 1.5 cups of water. Bring the mixture to a boil over medium-high heat, then reduce the heat to low, cover, and let it simmer for 20 minutes. After the rice is tender and the water has been absorbed, remove it from heat and allow it to cool slightly while keeping it covered.
Step 2: Form Rice Cups
Once the sushi rice has cooled slightly, prepare a muffin tin by lightly greasing it or using silicone muffin liners for easy removal. Press 2 heaping tablespoons of the cooled rice firmly into each muffin cup, compacting it well to maintain shape. Place the muffin tin in the refrigerator for about 20 minutes to help set the rice cups.
Step 3: Prepare Filling
While the rice cups chill, chop your chosen vegetables into small pieces, including ingredients like carrots, cucumber, and bell peppers. In a mixing bowl, combine 1/2 cup of these chopped veggies with 1/4 cup of steamed mukimame and 1/4 cup of diced avocado. Add your preferred sauce, such as soy sauce, and mix everything gently until evenly coated.
Step 4: Make Spicy Mayo
In a separate bowl, whisk together 1/4 cup of mayonnaise, 1 teaspoon of Sriracha sauce, 1 teaspoon of honey, and 1/2 teaspoon of sesame oil until the mixture is smooth and well-blended. Adjust the heat by adding more Sriracha as desired, making sure to create a balanced, creamy spicy mayo perfect for drizzling over your sushi cups.
Step 5: Assemble Cups
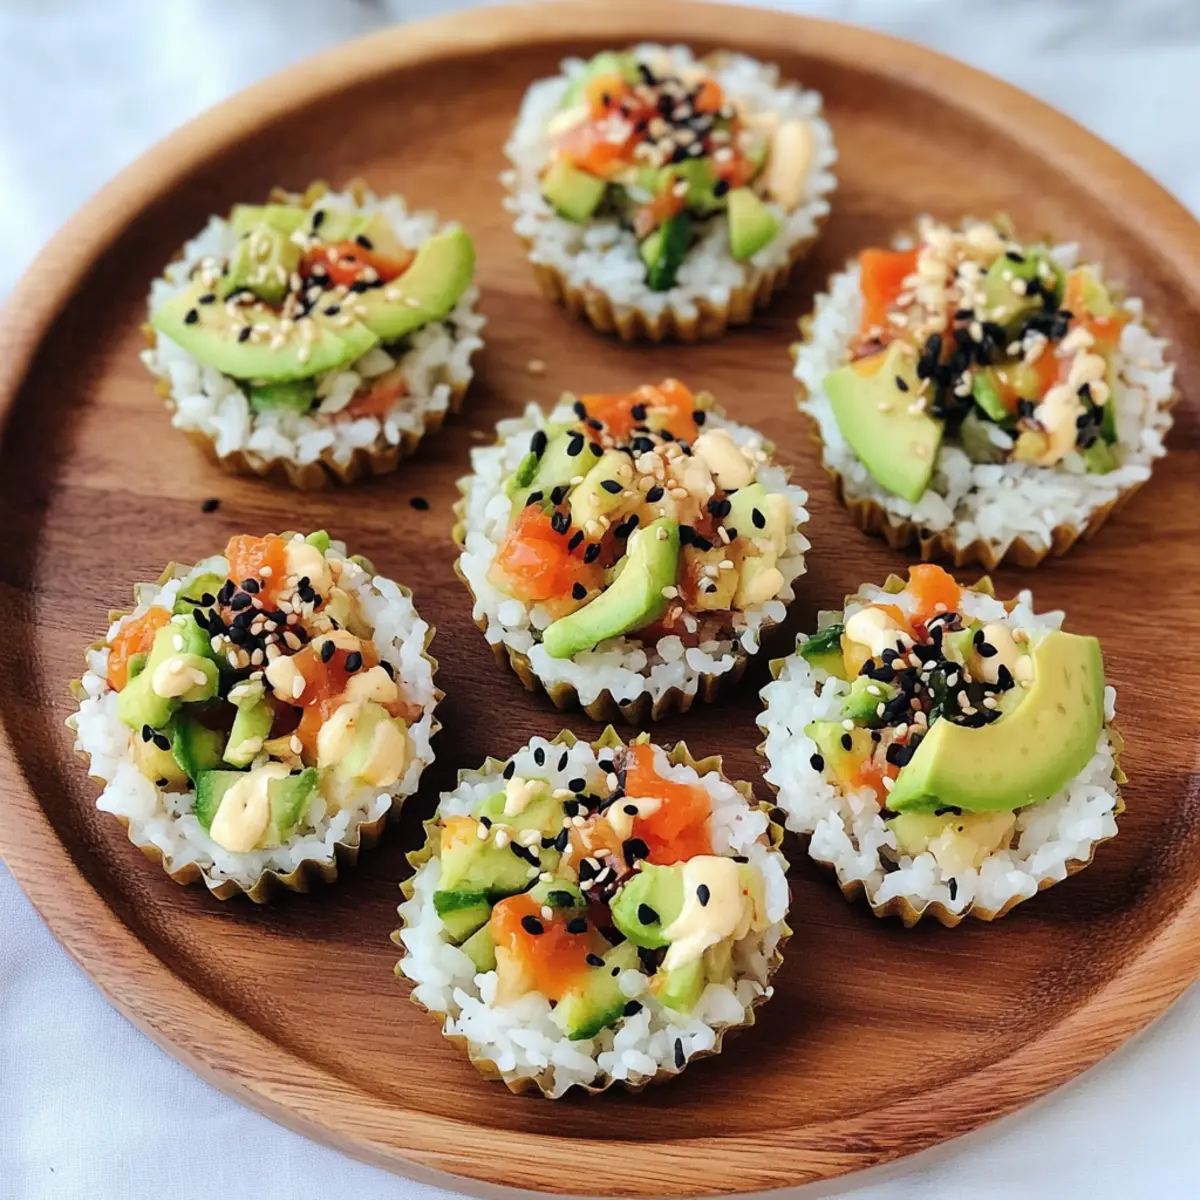
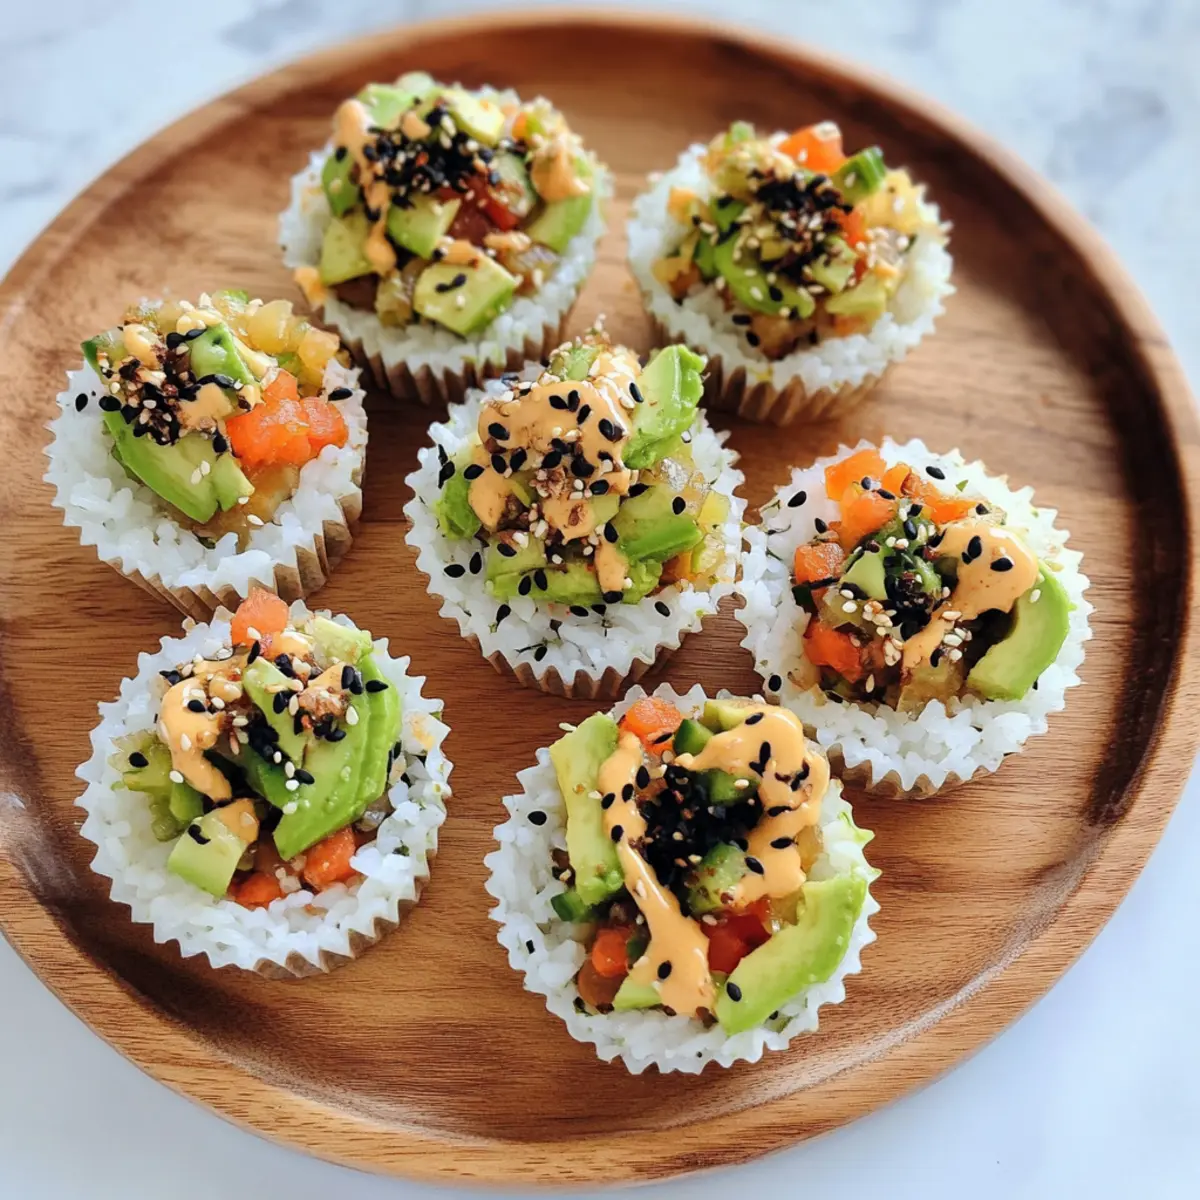
Take the chilled rice cups out of the refrigerator and carefully remove them from the muffin tin. Spoon a generous amount of the veggie filling over each sushi rice cup. Drizzle the prepared spicy mayo generously on top of the filling, then finish by sprinkling black sesame seeds for added crunch and visual appeal, showcasing your delightful sushi cups.
Storage Tips for Sushi Cups
Fridge: Store leftover sushi cups in an airtight container for up to 2 days to maintain freshness and prevent sogginess.
Freezer: If you want to keep them longer, freeze the rice cups without the filling or spicy mayo for up to 1 month. Assemble and enjoy fresh when ready!
Reheating: When ready to eat, thaw frozen cups in the fridge overnight, then microwave briefly to reheat. Avoid overcooking to keep the rice soft.
Serving: Enjoy these sushi cups cold or at room temperature for the best flavor experience—perfect for snacks on the go or light gatherings!
Make Ahead Options
These Sushi Cups are perfect for busy home cooks looking to save time without sacrificing flavor! You can prepare the sushi rice and rice cups up to 24 hours in advance, pressing the cooled rice into a muffin tin and refrigerating them until you’re ready to serve. The veggie filling, made from your choice of chopped vegetables, mukimame, and avocado, can also be prepped up to 3 days ahead—simply store it in an airtight container to keep it fresh. When you’re ready to impress your guests or enjoy a quick snack, just assemble your sushi cups by adding the veggie filling and drizzling the spicy mayo on top. This way, you’ll have deliciously fresh Sushi Cups that taste just as delightful as if they were made on the spot!
Helpful Tricks for Sushi Cups
-
Rinse Rice Thoroughly: Always rinse your sushi rice well before cooking to remove excess starch, preventing the rice from becoming gummy.
-
Compact Rice: Press the rice firmly into the muffin tin to ensure the sushi cups hold their shape when served—loose rice will crumble apart.
-
Chill for Best Texture: Allow the rice cups to chill in the fridge for at least 20 minutes after shaping; this helps them firm up and makes them easier to assemble.
-
Customize Veggies: Feel free to mix and match your favorite vegetables for the filling; just remember to keep the total amount around 1/2 cup for balance in each sushi cup.
-
Adjust Spiciness: Taste your spicy mayo before assembling and adjust the Sriracha according to your heat preference; you can always add more, but you can’t take it out!
-
Store Properly: Keep any leftover sushi cups in an airtight container in the refrigerator for up to 2 days, ensuring freshness for your snacking enjoyment.
Sushi Cups: Delicious Variations
Feel free to let your creativity shine as you customize these sushi cups to your liking!
- Protein-Packed: Add cooked shrimp or crab for a heartier filling. Simply chop and mix them in for a delightful twist.
- Spicy Kick: Increase the Sriracha in the mayo to amplify the heat. More spice means more excitement in every bite!
- Quinoa Swap: Replace sushi rice with quinoa for a unique flavor and added protein. This swap introduces a whole new texture!
- Veggie Medley: Substitute with seasonal vegetables like zucchini or radishes for fresh seasonal flavors. Try mixing in colorful bell peppers for a feast for the eyes!
- Vegan Delight: Use plant-based mayo and swap honey for agave to create a fully vegan option without sacrificing flavor. Enjoy a guilt-free treat!
- Crunchy Add-Ins: Add crispy fried onions or tempura flakes on top for extra crunch and an exciting contrast of textures. This small addition creates a big impact!
- Fruity Twist: Toss in diced mango or pineapple for a refreshing, tropical flair that perfectly complements the savory elements.
- Flavor Boost: Drizzle with ponzu sauce or sesame dressing instead of regular sauce for a deeper umami experience. Explore and enjoy new flavor profiles!
With these variations, creating your own perfect sushi cups is a delightful journey. You might also love trying out my Tot Appetizer Cups for another fun twist on flavors!
What to Serve with Customizable Sushi Cups with Spicy Mayo
Imagine a vibrant and satisfying spread that perfectly complements your delightful sushi cups, elevating your meal to the next level.
-
Crunchy Salad: A refreshing cucumber salad adds a light crunch to your meal. The coolness of cucumber balances the spicy mayo beautifully while enhancing the freshness of your sushi cups.
-
Edamame: Steamed edamame is a protein-packed snack that pairs perfectly with the flavors of sushi. Lightly salted and vibrant, they provide a delightful contrast in texture to your cups.
-
Miso Soup: This warm, savory soup brings umami depth to your dining experience. The soothing broth will enhance the lightness of the sushi cups, making them feel like a complete meal.
-
Teriyaki Glazed Tofu: For a heartier option, consider teriyaki-glazed tofu. Its sweet and savory flavor profile complements the sushi cups well, making for a satisfying vegetarian delight.
-
Sweet Potato Fries: Crispy, seasoned sweet potato fries pair wonderfully with sushi cups. Their sweetness offers a delightful contrast to the spicy mayo, creating a wonderful flavor balance.
-
Green Tea: A warm cup of green tea cleanses the palate and uplifts the meal. Its subtle bitterness and earthy notes harmonize beautifully with the savoriness of your sushi cups.
-
Fruit Platter: Offer a vibrant fruit platter as a refreshing dessert option. The natural sweetness from seasonal fruits provides a light finish after indulging in the spicy flavors of the sushi cups.
Sushi Cups Recipe FAQs
How do I select the right vegetables for my sushi cups?
Absolutely! When choosing vegetables, fresh and crispy options like carrots, cucumber, bell peppers, or sprouts work beautifully. Look for vibrant colors and firm textures. Avoid any that show dark spots or appear wilted for the best results!
What is the best way to store leftover sushi cups?
To keep your leftover sushi cups fresh, store them in an airtight container in the refrigerator for up to 2 days. This prevents sogginess while maintaining the flavor. For longer storage, consider freezing the rice cups without fillings.
Can I freeze my sushi cups for later use?
Certainly! To freeze your sushi cups, assemble the rice base without the filling or spicy mayo first. Place them in a single layer on a baking sheet to freeze, then transfer to a zip-top freezer bag. These can be stored for up to 1 month. When ready to enjoy, thaw in the fridge overnight and fill with fresh ingredients.
What if my sushi rice turns out too sticky or gummy?
No worries! If your sushi rice is sticky, this often happens due to insufficient rinsing before cooking. Be sure to rinse the rice well under cold water until the water runs clear to remove excess starch. If it’s overcooked, try adding a dash of rice vinegar and tossing gently to fluff it up.
Are sushi cups suitable for people with food allergies?
Very! You can easily customize the ingredients to suit various dietary needs. For non-dairy options, substitute regular mayonnaise with vegan mayo, and ensure your sauces, like soy sauce, are gluten-free if needed. Always check labels for allergens if you’re serving to guests with specific dietary restrictions.
How long can I keep sushi cups in the refrigerator?
I often advise using your sushi cups within 2 days for optimal freshness. Their delightful crunch and flavor are best enjoyed soon after assembly. If you need them for an event, feel free to make the rice cups in advance and assemble just before serving!
Delicious Sushi Cups: Customizable Bites of Joy
Ingredients
Equipment
Method
- In a medium pot, combine 1 cup of rinsed sushi rice with 1.5 cups of water. Bring to a boil, reduce heat, cover, and simmer for 20 minutes.
- After rice is done, let it cool slightly in the pot while keeping it covered.
- Grease a muffin tin or use silicone liners. Press 2 heaping tablespoons of cooled rice into each cup; compact well and chill in the fridge for 20 minutes.
- Chop chosen veggies and combine with mukimame, diced avocado, and sauce in a bowl, mixing gently.
- Whisk together mayonnaise, Sriracha, honey, and sesame oil in a bowl until smooth, adjusting heat as necessary.
- Carefully remove rice cups from muffin tin, spoon veggie filling on top, drizzle with spicy mayo, and sprinkle with black sesame seeds.
Leave a Reply