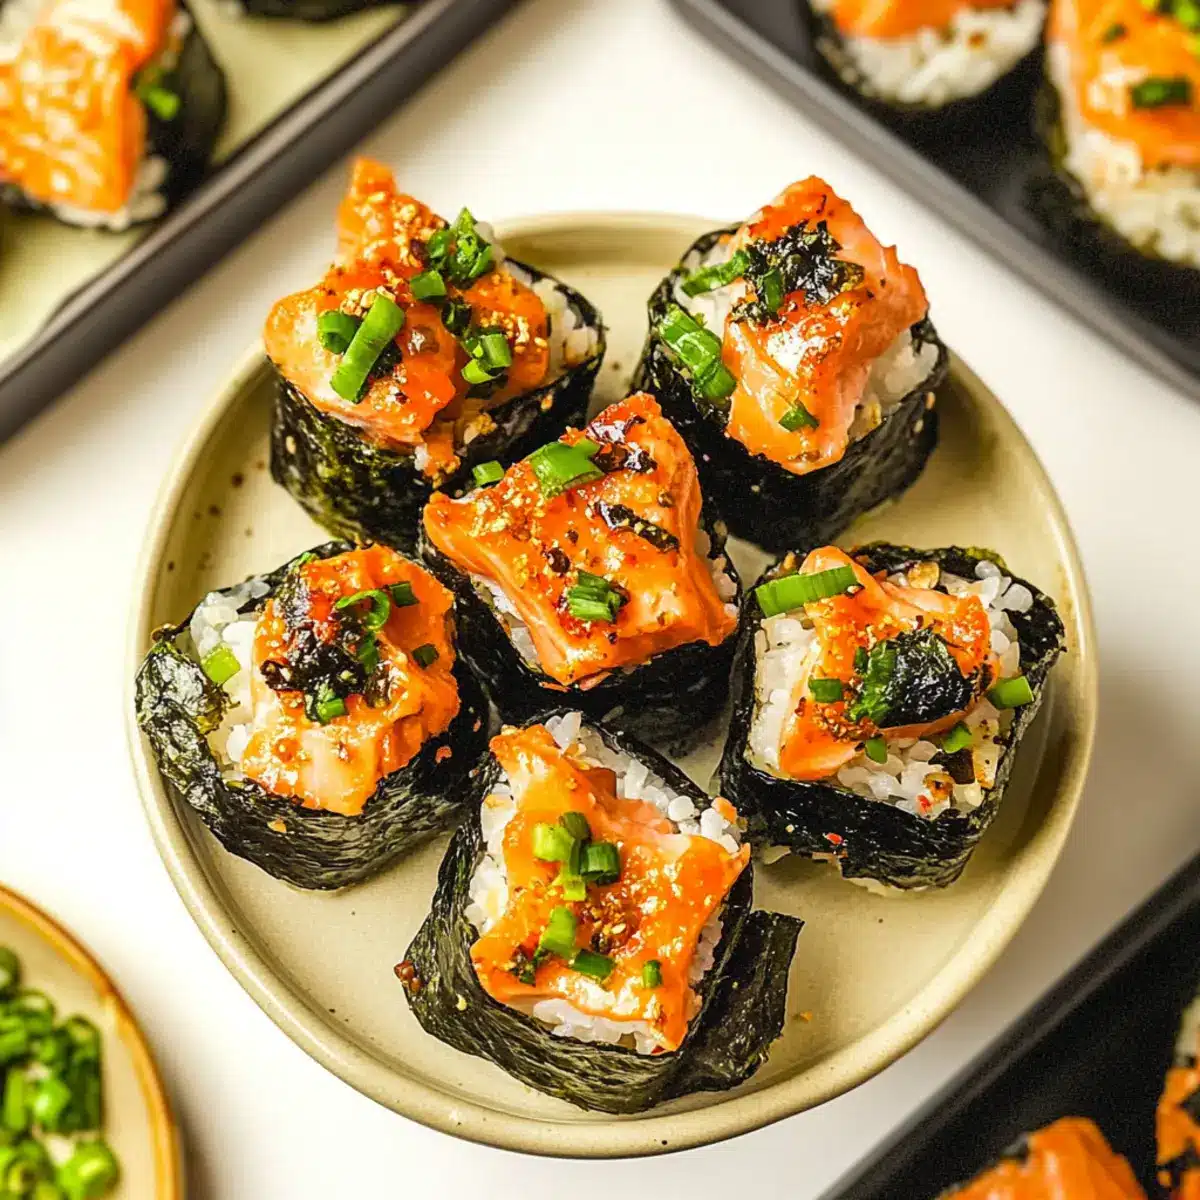
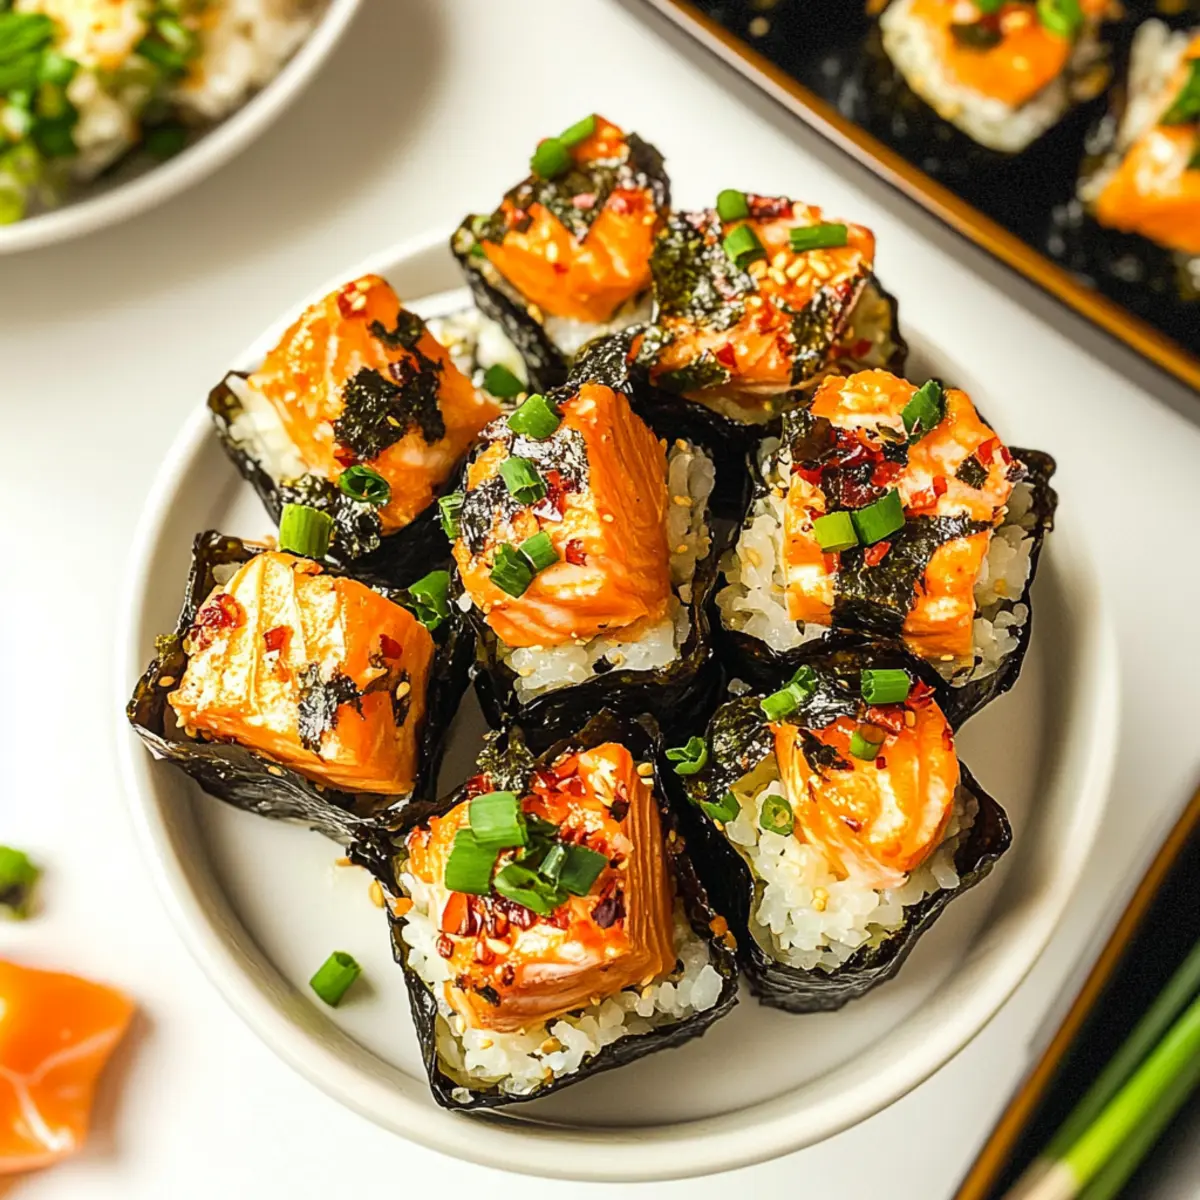
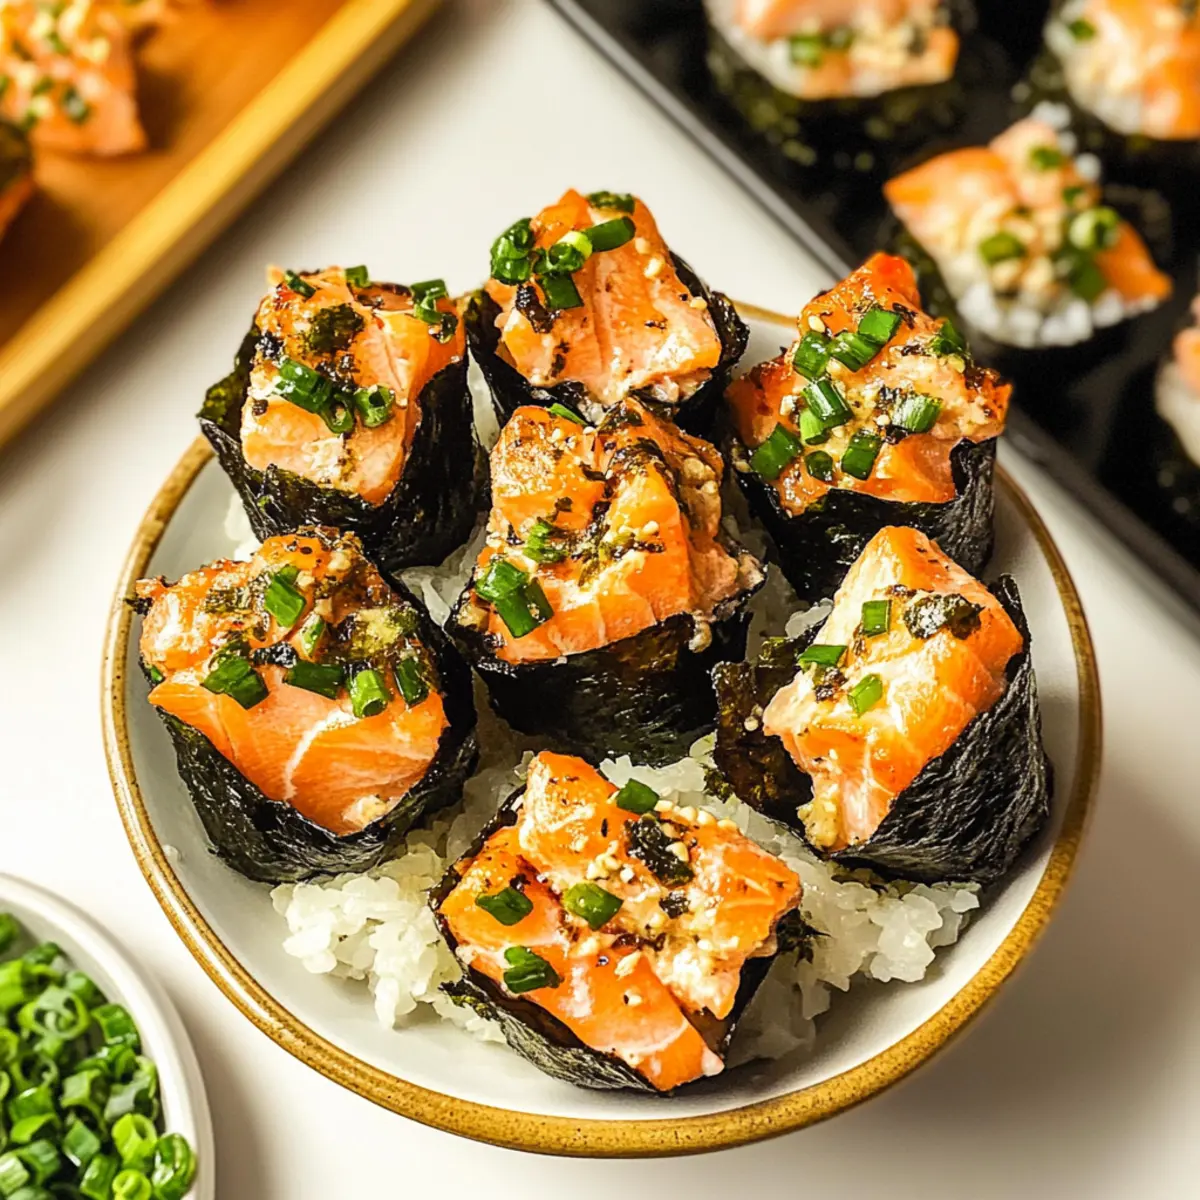
As I sifted through my kitchen, a delightful aroma whisked me away to a cozy sushi bar, reminding me that homemade sushi doesn’t need to be a fancy affair. Enter my Easy Baked Salmon Sushi Cups—a playful twist on traditional sushi rolls that brings the same mouthwatering flavors without the fuss of rolling. With tender salmon paired with fluffy sushi rice and crispy nori, these appetizers are a fantastic choice for gatherings or an inviting weeknight snack. What’s more, this quick 30-minute recipe is not only effortless to whip up, but it’s also a surefire hit with anyone looking to indulge in some delicious comfort food. So, what do you think—are you ready to create your own sushi masterpiece?
Why are Baked Salmon Sushi Cups a Must-Try?
Simplicity at Its Best: This recipe requires minimal prep, making it perfect for busy weeknights or spontaneous gatherings.
Flavor Fusion: A savory blend of tender salmon, fluffy sushi rice, and crispy nori delivers a fabulous taste that sushi lovers will adore.
Crowd-Pleasing Delight: Ideal for parties, these sushi cups are sure to impress guests, offering a unique twist that sets them apart from traditional appetizers.
Customizable Fun: You can easily swap ingredients, trying crab, shrimp, or even tofu, depending on your taste preferences!
Quick Cooking Time: In just 30 minutes, you’ll have a delicious, home-cooked app that’s perfect for any occasion.
Check out my Tot Appetizer Cups for more easy party favorites!
Baked Salmon Sushi Cups Ingredients
For the Salmon Mixture
- Salmon – Tender protein base that provides rich flavor. Note: Fresh salmon is preferable for the best taste, but canned or cooked salmon can be used in a pinch.
- Light Soy Sauce – Adds umami and saltiness to the salmon mixture. Substitution: Tamari for a gluten-free option.
- Kewpie Mayo – Creamy element that adds richness and enhances the flavor profile. Substitution: Regular mayonnaise or homemade mayo can be used, but adjust for extra tang.
- Sriracha – Offers a spicy kick and adds depth to the salmon mix. Substitution: Any hot sauce or chili paste to taste.
- Sesame Oil – Provides a nutty aroma and flavor. Substitution: Olive oil or grapeseed oil if unavailable, but taste will differ slightly.
For the Sushi Rice
- Sushi Rice – The base of the sushi cups that provides structure and texture. Note: Use short-grain sushi rice for the best results.
- Rice Vinegar – Balances the rice sweetness and enhances overall taste. Substitution: Apple cider vinegar or white wine vinegar can work in a pinch.
- White Sugar – Balances the acidity of the vinegar, adding a touch of sweetness. Substitution: Honey or agave syrup can work as alternatives.
For the Nori Cups
- Nori Sheets – Wraps the sushi cups, providing a savory sea flavor. Note: Sheets can be cut to size, ensuring they fit muffin tins.
For the Garnish
- Furikake – Japanese seasoning mix for garnishing that adds texture and flavor. Substitution: Toasted sesame seeds or crushed seaweed can be used for a similar effect.
- Green Onion – Fresh garnish that adds a crunch and mild onion flavor. Substitution: Chives or scallions can also work well.
These Baked Salmon Sushi Cups are not just easy to make, but they also embody warmth and a sense of home that is sure to enchant your taste buds!
Step‑by‑Step Instructions for Easy Baked Salmon Sushi Cups
Step 1: Cook Sushi Rice
Begin by preparing the sushi rice according to its package instructions, typically rinsing it well and cooking it in a rice cooker or on the stove. In a small bowl, mix rice vinegar with white sugar and microwave until dissolved. Once the rice is ready and still warm, gently fold in the vinegar mixture, ensuring an even distribution, and allow it to cool while you prepare the other components.
Step 2: Prepare Salmon Mixture
In a medium-sized mixing bowl, cube the fresh salmon into bite-sized pieces. Add light soy sauce, Kewpie mayo, sriracha, and sesame oil, carefully blending the ingredients until the salmon is well-coated and the mixture is creamy with a hint of spice. Set this flavorful salmon mixture aside while you prepare the nori cups.
Step 3: Prepare Nori
Take your nori sheets and carefully cut them into squares that will fit snugly into the cups of a muffin tin. The nori should have enough overlap to hold the filling but not be too large. This step is essential for ensuring your Baked Salmon Sushi Cups maintain their shape while baking.
Step 4: Assemble Cups
Lightly grease the muffin tins with cooking spray to prevent sticking. Press a piece of nori into each cup, forming a natural bowl shape. Spoon a generous amount of the prepared sushi rice into the nori, packing it down firmly. Finally, top each rice-filled nori cup with an equal portion of the salmon mixture, ensuring they are filled to the brim for a hearty bite.
Step 5: Bake
Preheat your oven to 400°F (200°C). Place the muffin tin in the oven and bake the sushi cups for about 15 minutes, or until the salmon appears cooked through and the tops are a golden brown. Keep an eye on them to prevent over-baking, which can lead to dryness.
Step 6: Garnish and Serve
After baking, remove the sushi cups from the oven and let them cool for a moment. Drizzle additional sriracha or spicy mayo on top if desired. Sprinkle with furikake and garnish with chopped green onions for that extra crunch and flavor. Serve your warm Baked Salmon Sushi Cups immediately, and savor the delightful fusion of tastes!

Baked Salmon Sushi Cups Variations
Feel free to play with these ideas and create your own perfect sushi cups tailored to your taste!
-
Crab Option: Substitute salmon with imitation crab for a sweeter, milder flavor that pairs beautifully with the sushi rice.
-
Shrimp Delight: Use cooked shrimp instead of salmon for a delightful seafood twist; just chop them into bite-sized pieces before mixing.
-
Tofu Alternative: For a plant-based option, swap salmon with firm tofu; marinate for a bit in soy sauce for added flavor before mixing.
-
Veggie-Filled: Incorporate diced vegetables like bell peppers, cucumbers, or avocado into the salmon mix for an extra crunch and freshness.
-
Spicy Kick: Add more sriracha or diced jalapeños to the salmon mixture for those who like it hot. You can also drizzle with spicy mayo for a burst of flavor.
-
Herb Infusion: Mix in fresh herbs like cilantro or basil to the salmon for a unique flavor twist; the freshness elevates the whole dish.
-
Tempura Crunch: Sprinkle tempura flakes on top before serving for a delightful crunchy texture that adds a fun twist to these sushi cups.
-
Furikake Swap: Experiment with different toppings—try sushi seasoning or even crushed wasabi peas for a unique flavor profile.
With these fun variations, you can bring even more creativity to your Baked Salmon Sushi Cups, making each batch uniquely delicious. If you’re in the mood for more easy-to-make treats, check out my delightful Cookie Butter Cheesecake or explore these crispy Tot Appetizer Cups!
Make Ahead Options
These Easy Baked Salmon Sushi Cups are a fantastic choice for meal prep, allowing you to save time and enjoy homemade flavors even on your busiest days. You can prepare the sushi rice and salmon mixture up to 24 hours in advance—simply refrigerate them in airtight containers. Additionally, you can cut the nori sheets and store them separately to ensure they stay crisp. When ready to serve, assemble the cups by layering the nori, rice, and salmon mixture before baking. Bake as directed, ensuring they remain just as delicious and comforting as when freshly made. With these make-ahead tips, you’ll have a delightful meal ready in no time!
What to Serve with Easy Baked Salmon Sushi Cups
Create a full meal that elevates your dining experience by pairing these delightful bites with various complementary sides and drinks.
-
Cucumber Salad: A refreshing, crisp side that balances the richness of the salmon cups with a light, crunchy texture. Toss in sesame dressing for an extra flavor boost!
-
Edamame: Steamed and lightly salted, this protein-rich snack is the perfect finger food to serve alongside, adding an element of fun and healthiness to your meal.
-
Pickled Ginger: Serve a small bowl of pickled ginger to cleanse the palate between bites, enhancing the sushi experience with its zesty, tangy notes.
-
Spicy Mayo Dip: Create a simple spicy mayo by mixing mayonnaise with sriracha — a fantastic dip that mirrors the flavors within the sushi cups for a consistent taste journey!
-
Miso Soup: Warm, comforting miso soup offers a unique flavor contrast while adding a traditional touch to your meal. Its umami richness complements the salmon beautifully.
-
Sake: Toast your meal with a glass of chilled sake. The light, fruity flavor pairs excellently with the umami of the salmon, enhancing the overall dining experience.
How to Store and Freeze Baked Salmon Sushi Cups
Fridge: Place leftover Baked Salmon Sushi Cups in an airtight container and store in the refrigerator for up to 3 days. This will keep them fresh while you enjoy your delicious creations!
Freezer: For longer storage, freeze the sushi cups in a single layer on a baking sheet. Once frozen, transfer them to a freezer-safe bag or container. They can be kept for up to 2 months.
Reheating: To reheat, bake from frozen at 350°F (175°C) for about 15-20 minutes until heated through and crispy again. Alternatively, reheat refrigerated cups in the oven for about 10 minutes.
Pro Tip: Always ensure the sushi cups are tightly wrapped or sealed to maintain flavor and texture during storage!
Expert Tips for Baked Salmon Sushi Cups
-
Freshness Matters: Use fresh salmon for the best flavor; frozen salmon can be used, but ensure it’s thoroughly defrosted before mixing.
-
Rice Texture: Make sure to use short-grain sushi rice, as it sticks together perfectly, ensuring your Baked Salmon Sushi Cups hold their shape.
-
Nori Fit: Cut nori sheets to fit snugly in the muffin tins; too large and they’ll overflow, too small and they’ll fall apart.
-
Watch the Bake Time: Check for doneness around the 12-minute mark; overbaking can dry out the salmon and affect the overall texture.
-
Spice It Up: Adjust the Sriracha according to your spice preference; taste the salmon mixture for balance before baking!
Baked Salmon Sushi Cups Recipe FAQs
What type of salmon should I use?
Absolutely! Fresh salmon is preferable for the best flavor and texture, but if you’re in a pinch, canned or cooked salmon can work just fine. Just make sure it’s flaked and easy to mix into your salmon mixture.
How long can I store Baked Salmon Sushi Cups?
You can store leftover Baked Salmon Sushi Cups in an airtight container in the refrigerator for up to 3 days. This will keep them fresh and ready for a quick snack or meal!
Can I freeze the sushi cups?
Very! To freeze, place the sushi cups in a single layer on a baking sheet and freeze until solid. Then, transfer them to a freezer-safe bag or container, where they can be kept for up to 2 months. When you’re ready to enjoy them again, simply bake from frozen at 350°F (175°C) for about 15-20 minutes until heated through.
What should I do if the sushi cups seem dry after baking?
If your Baked Salmon Sushi Cups turn out dry, it could be due to overbaking. It’s best to check for doneness around the 12-minute mark to ensure they remain moist. In the future, consider reducing the baking time or covering with foil during the last few minutes to retain moisture.
Are Baked Salmon Sushi Cups safe for people with seafood allergies?
No, these sushi cups contain salmon, and they’re not suitable for those with seafood allergies. For a delicious alternative, consider substituting the salmon with tofu or roasted vegetables for a veggie-friendly version!
Delicious Baked Salmon Sushi Cups for Easy Entertaining
Ingredients
Equipment
Method
- Begin by preparing the sushi rice according to its package instructions, typically rinsing it well and cooking it in a rice cooker or on the stove. In a small bowl, mix rice vinegar with white sugar and microwave until dissolved. Once the rice is ready and still warm, gently fold in the vinegar mixture, ensuring an even distribution, and allow it to cool while you prepare the other components.
- In a medium-sized mixing bowl, cube the fresh salmon into bite-sized pieces. Add light soy sauce, Kewpie mayo, sriracha, and sesame oil, carefully blending the ingredients until the salmon is well-coated and the mixture is creamy with a hint of spice. Set this flavorful salmon mixture aside while you prepare the nori cups.
- Take your nori sheets and carefully cut them into squares that will fit snugly into the cups of a muffin tin. The nori should have enough overlap to hold the filling but not be too large. This step is essential for ensuring your Baked Salmon Sushi Cups maintain their shape while baking.
- Lightly grease the muffin tins with cooking spray to prevent sticking. Press a piece of nori into each cup, forming a natural bowl shape. Spoon a generous amount of the prepared sushi rice into the nori, packing it down firmly. Finally, top each rice-filled nori cup with an equal portion of the salmon mixture, ensuring they are filled to the brim for a hearty bite.
- Preheat your oven to 400°F (200°C). Place the muffin tin in the oven and bake the sushi cups for about 15 minutes, or until the salmon appears cooked through and the tops are a golden brown. Keep an eye on them to prevent over-baking, which can lead to dryness.
- After baking, remove the sushi cups from the oven and let them cool for a moment. Drizzle additional sriracha or spicy mayo on top if desired. Sprinkle with furikake and garnish with chopped green onions for that extra crunch and flavor. Serve your warm Baked Salmon Sushi Cups immediately, and savor the delightful fusion of tastes!
Leave a Reply