As I stood in my kitchen, a wave of nostalgia washed over me, recalling the excitement of crafting playful desserts during Easter with family. These No-Bake Easter Egg Oreo Cookie Balls perfectly encapsulate that joy—each ball is a delightful blend of creamy cheesecake filling and a sweet, chocolatey shell. This simple recipe is not only a fantastic bonding activity for kids and adults alike but also a true crowd-pleaser at any spring gathering. With zero baking involved, you can whip them up in no time, making them an effortless yet festive addition to your Easter celebrations. Curious to see just how easy it is to create these irresistible treats? Let’s dive in!
Why Are These Cookie Balls So Irresistible?
Ease of Preparation: This no-bake recipe is a breeze, allowing you to skip the oven without sacrificing flavor.
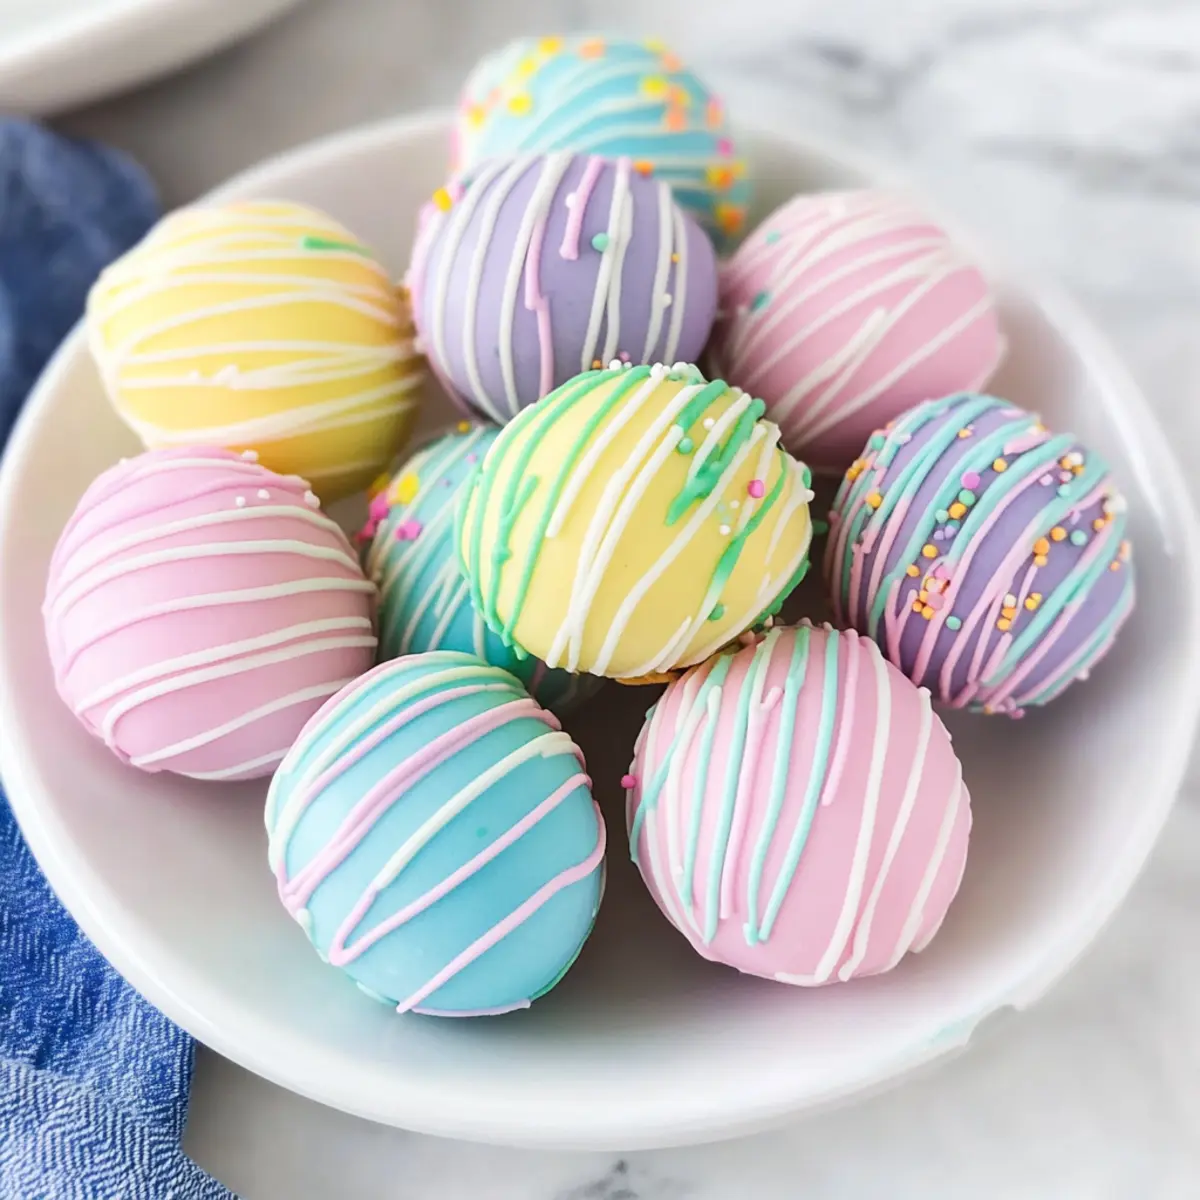
Festive Appeal: Their vibrant colors and charming egg shape make these cookie balls an eye-catching treat perfect for Easter gatherings.
Family-Friendly Fun: Kids will love helping mix, shape, and decorate these delightful treats, creating memorable moments in the kitchen.
Flavor Versatility: Feel free to swap ingredients for a personalized touch—try different Oreo flavors or colorful candy coatings to suit everyone’s taste.
Chocolatey Indulgence: With a creamy cheesecake center enveloped in a sweet chocolate shell, these cookie balls deliver a decadent taste that satisfies sweet cravings.
Perfect for Gifting: Present these beauties in baskets or on trays for a lovely homemade gift—like the festive touch found in Christmas Sugar Cookie gifts!
Easter Egg Oreo Cookie Balls Ingredients
For the Cookie Mixture
• Golden Oreos – The star of these treats, providing a buttery vanilla flavor and structure; try Chocolate Oreos for a fun twist.
• Cream Cheese – Gives the filling its creamy texture; ensure it’s softened for easy mixing, as substitutes can alter the final taste.
For the Coating
• White Candy Coating – Forms a sweet outer shell; colored candy melts can be used for a festive look, just avoid liquid food dye.
• Gel Icing Colors – Perfect for tinting your candy coating to achieve pastel hues; allows for creative customization.
For Decoration
• Sprinkles/Sanding Sugar (optional) – Add a decorative touch and fun texture; easily swapped or omitted if you prefer a simpler look.
Enjoy making these delightful Easter Egg Oreo Cookie Balls that are sure to impress at your spring celebrations!
Step‑by‑Step Instructions for Easter Egg Oreo Cookie Balls
Step 1: Crush Oreos
Begin by gathering your Golden Oreos and placing them into a food processor. Pulse the cookies until they reach a fine sandy texture, taking care not to leave large chunks—this should take about 1-2 minutes. The cookie crumbs will provide the base for your delightful Easter Egg Oreo Cookie Balls, creating a buttery flavor that perfectly complements the cream cheese.
Step 2: Mix Dough
In a large mixing bowl, combine the finely crushed Oreos with softened cream cheese. Use a spatula or hand mixer to blend the mixture until it forms a smooth, cohesive dough that holds together well. This step usually takes about 2-3 minutes; the creamy filling will give your Easter Egg Oreo Cookie Balls their signature taste and texture.
Step 3: Shape Eggs
Once your dough is well mixed, take about 1½ tablespoons of the mixture and roll it between your hands to form oval shapes, resembling eggs. Place each shaped egg onto a sheet of parchment paper to prevent sticking. Continue this process until all the dough is shaped, creating a festive array of colorful Easter Egg Oreo Cookie Balls, which should yield around 20-24 pieces.
Step 4: Chill
Cover your tray of egg-shaped balls with plastic wrap and refrigerate for about 1 hour. This chilling step is crucial as it allows the balls to firm up, making them easier to dip in the candy coating. When ready, they should feel slightly firm to the touch, ensuring they maintain their shape during the coating process.
Step 5: Melt Coating
While your cookie balls chill, prepare the white candy coating. Place the candy melts in a microwave-safe bowl and heat them in short bursts of 30 seconds, stirring in between until fully melted and smooth—this should take about 1-2 minutes total. Be careful not to overheat and ensure the mixture remains at a pourable consistency for easy dipping of your Easter Egg Oreo Cookie Balls.
Step 6: Dip Eggs
Retrieve your chilled cookie balls from the refrigerator, and one by one, dip each egg into the melted candy coating. Ensure the entire egg is covered, allowing any excess coating to drip back into the bowl. Return the dipped egg to the parchment paper, creating a smooth, sweet shell for your Easter Egg Oreo Cookie Balls while preparing for the final decorative touches.
Step 7: Decorate
If desired, melt additional coating and tint it with gel icing colors to create festive designs. Drizzle the colored coating over the dipped eggs for a decorative flair, and sprinkle with colorful sprinkles or sanding sugar while the coating is still wet. This step will add a lively touch to your Easter Egg Oreo Cookie Balls, making them truly eye-catching.
Step 8: Serve/Store
Once decorated, place your completed Easter Egg Oreo Cookie Balls in the refrigerator to set for about 30 minutes. They can be enjoyed right away or stored in an airtight container in the fridge for up to a week. These sweet treats are perfect for any spring gathering or a lovely homemade treat to share with family and friends!

Make Ahead Options
These delightful Easter Egg Oreo Cookie Balls are perfect for busy home cooks looking to streamline their meal prep! You can prepare the cookie mixture and roll the eggs up to 24 hours in advance; simply store them in an airtight container in the refrigerator to keep them fresh. Additionally, you can melt the candy coating ahead of time and store it in a sealed container at room temperature. When you’re ready to serve, just take the chilled cookie balls out of the fridge, dip them in the melted coating, decorate as desired, and let them set in the fridge for about 30 minutes. This preparation ensures you enjoy these festive treats with minimum effort while keeping their deliciousness intact!
Easter Egg Oreo Cookie Balls Variations
Feel free to get creative and personalize these cookie balls with these delightful twists that make them even more special!
-
Alternative Oreos: Substitute Golden Oreos with Mint, Birthday Cake, or Lemon Oreos for a unique flavor experience. Each variation offers a playful twist that’ll surprise your taste buds.
-
Chocolate Coating: Use milk chocolate or dark chocolate instead of white candy coating for a richer, indulgent flavor. The combination of creamy filling with dark chocolate creates a luxurious treat.
-
Flavored Cream Cheese: Spice things up with flavored cream cheese, such as strawberry or blueberry. This also adds a fruity element to the filling, perfect for springtime delight.
-
Nut Butter Swirl: Add a spoonful of peanut butter or almond butter to the cream cheese mixture, enhancing the richness and creamy texture. This nutty addition brings a delicious twist to the traditional cookie ball.
-
Spiced Coating: Mix in cinnamon or a pinch of nutmeg into your chocolate coating for a warm, spicy flair that perfectly complements the sweet Oreo filling.
-
Decorative Toppings: Get creative with additional toppings like crushed nuts or edible glitter for a festive touch. These extra details make your Easter Egg Oreo Cookie Balls a visual delight!
-
Sugar-Free Option: Opt for a sugar-free cream cheese and sugar-free Oreos for a lighter version that still delivers on taste. Simply swap these ingredients and enjoy without the guilt!
-
Chilled Dessert: For a refreshing touch, freeze them instead of refrigerating. Serve these frozen bites at summer gatherings for a cool, delightful treat—perfect for warm days and family picnics.
With these variations, you can tailor the Easter Egg Oreo Cookie Balls to suit any gathering or personal preference. If you’re intrigued by more festive desserts, don’t forget to check out our delightful Strawberry Cheesecake Cookies!
Expert Tips for Easter Egg Oreo Cookie Balls
-
Crush Finely: Ensure the Golden Oreos are crushed to a fine breadcrumb consistency to prevent cracks in the candy coating.
-
Soft Cream Cheese: Always use softened cream cheese to achieve a smooth, cohesive dough. Cold cream cheese can lead to a lumpy mixture.
-
Use Glass Bowls: When melting the candy coating, opt for microwave-safe glass bowls to ensure even melting. Avoid introducing any water to prevent seizing.
-
Chill Enough: Chill your shaped cookie balls for at least an hour. This makes them easier to dip in the coating and helps maintain their shape.
-
Color Choices: Experiment with gel icing colors for a vibrant finish, but remember to keep the candy melting coating at a consistent thickness—avoid liquid dyes as they can ruin the texture.
-
Decorate Quickly: Work swiftly when decorating with sprinkles or additional drizzles to ensure they adhere well to the coating of your Easter Egg Oreo Cookie Balls.
Storage Tips for Easter Egg Oreo Cookie Balls
Fridge: Store your Easter Egg Oreo Cookie Balls in an airtight container in the refrigerator for up to 1 week to maintain freshness and flavor.
Freezer: For longer storage, freeze the cookie balls for up to 3 months. Place them in a single layer on a baking sheet to freeze, then transfer to an airtight container.
Thawing: To enjoy frozen cookies, thaw them in the fridge overnight before serving. This keeps them from getting mushy.
Tips for Serving: Serve chilled or at room temperature; the flavors enhance as they sit. Enjoy them within a week for the best taste!
What to Serve with Easter Egg Oreo Cookie Balls
These delightful treats are not only a sweet indulgence but also a fantastic way to round out your spring celebrations with colorful accompaniments.
-
Fresh Fruit Salad: A vibrant mix of berries and citrus adds a refreshing contrast to the creamy cookie bites, brightening up the dessert table.
-
Light Lemonade: A zesty, chilled lemonade brings a refreshing tang that cuts through the sweetness, making for a perfect warm-weather drink.
-
Mini Cheesecakes: These petite treats echo the creamy flavor of the cookie balls, offering a delightful variety without straying too far from the rich taste.
-
Chocolate-Covered Strawberries: Juicy strawberries dipped in rich chocolate create a luxurious pair with the Oreo cookie balls, enhancing the chocolate experience.
-
Kids’ Punch: Create a fun, colorful punch with fruit juices and sprinkles. This whimsical drink will pair beautifully with the festive essence of the cookie balls.
-
Coffee or Tea: A warm cup of brewed coffee or herbal tea adds a comforting touch, balancing out the sweetness of the cookie balls in a pleasing way.
-
Carrot Cake Muffins: These moist, spiced muffins are a perfect nod to the Easter theme, complementing the flavors of the Oreo cookie balls while adding a satisfying texture.
Feel free to mix and match these suggestions for an unforgettable dessert spread that delights guests of all ages!

Easter Egg Oreo Cookie Balls Recipe FAQs
How do I choose the best Oreos for this recipe?
Absolutely! For the most flavorful results, I recommend using Golden Oreos for their buttery vanilla taste. If you’re looking to mix things up, Chocolate Oreos can provide a delicious twist, but keep in mind that the appearance will change. Just make sure whichever kind you choose is fresh, with no dark spots or cracks, to guarantee the best flavor and texture!
How should I store my Easter Egg Oreo Cookie Balls?
To keep your delightful Easter Egg Oreo Cookie Balls fresh, store them in an airtight container in the refrigerator where they’ll stay delicious for up to 1 week. If you plan to save some for later, it’s best to freeze them to maintain their creamy filling and coating. Just make sure to separate them with parchment paper so they don’t stick together!
Can I freeze Easter Egg Oreo Cookie Balls, and how?
Yes, indeed! To freeze your Easter Egg Oreo Cookie Balls, place them in a single layer on a baking sheet and freeze until firm (approximately 2 hours). Then transfer them to an airtight container or a freezer bag, layering parchment paper between each layer to prevent sticking. They can be frozen for up to 3 months. When you’re ready to enjoy them, just thaw overnight in the fridge to keep them perfectly creamy!
What should I do if my chocolate coating isn’t smooth?
Very! If your candy coating is seizing up or not melting smoothly, it may have come into contact with moisture or been overheated. To fix this, add a small splash of vegetable oil or shortening to the melted coating to help smooth it out. Heat gently in the microwave for 10-15 second intervals, stirring well in between until you achieve a pourable consistency. This should do the trick!
Are these Easter Egg Oreo Cookie Balls safe for kids with allergies?
Definitely! While this recipe is vegetarian, it contains dairy and may not be suitable for anyone with a dairy allergy. Always check the packaging for allergen warnings, especially with the Oreos and white candy coating, as some brands may process with nuts. To make them allergen-friendly, consider using dairy-free cream cheese and suitable candy coatings.
How do I achieve the pastel colors for my coating?
To create beautiful pastel colors for your Easter Egg Oreo Cookie Balls, add gel icing colors to your melted candy coating gradually, stirring well until you reach your desired shade. Since gel colors are more concentrated, a little goes a long way, and they won’t thin out the coating like liquid colors would. Just remember to work quickly, as the coating can start to set once cooled!

Delightful Easter Egg Oreo Cookie Balls for a Fun Dessert Adventure
Ingredients
Equipment
Method
- Begin by gathering your Golden Oreos and placing them into a food processor. Pulse until fine.
- In a large bowl, combine crushed Oreos with softened cream cheese and mix until smooth.
- Take about 1½ tablespoons of the mixture and roll into egg shapes. Place on parchment paper.
- Cover with plastic wrap and refrigerate for about 1 hour to firm up.
- Melt white candy coating in a microwave-safe bowl, heating in short bursts until smooth.
- Dip each egg into the melted coating, ensuring they are fully covered. Return to parchment paper.
- Melt additional coating and tint with gel icing colors for designs. Drizzle and decorate with sprinkles.
- Refrigerate decorated cookie balls for 30 minutes before serving or store in an airtight container.
Leave a Reply