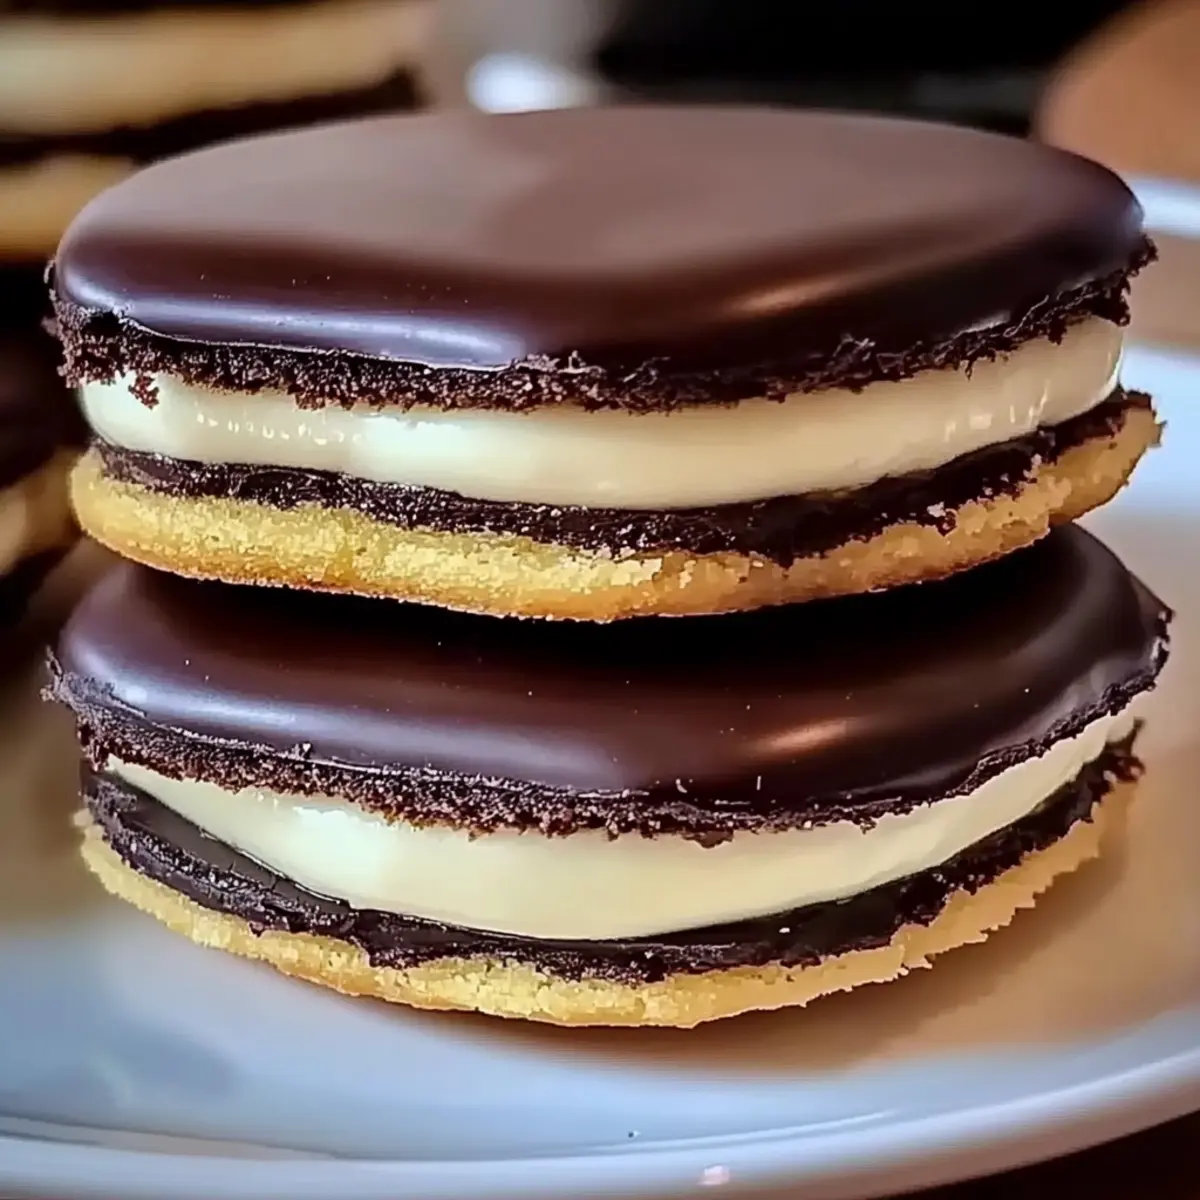
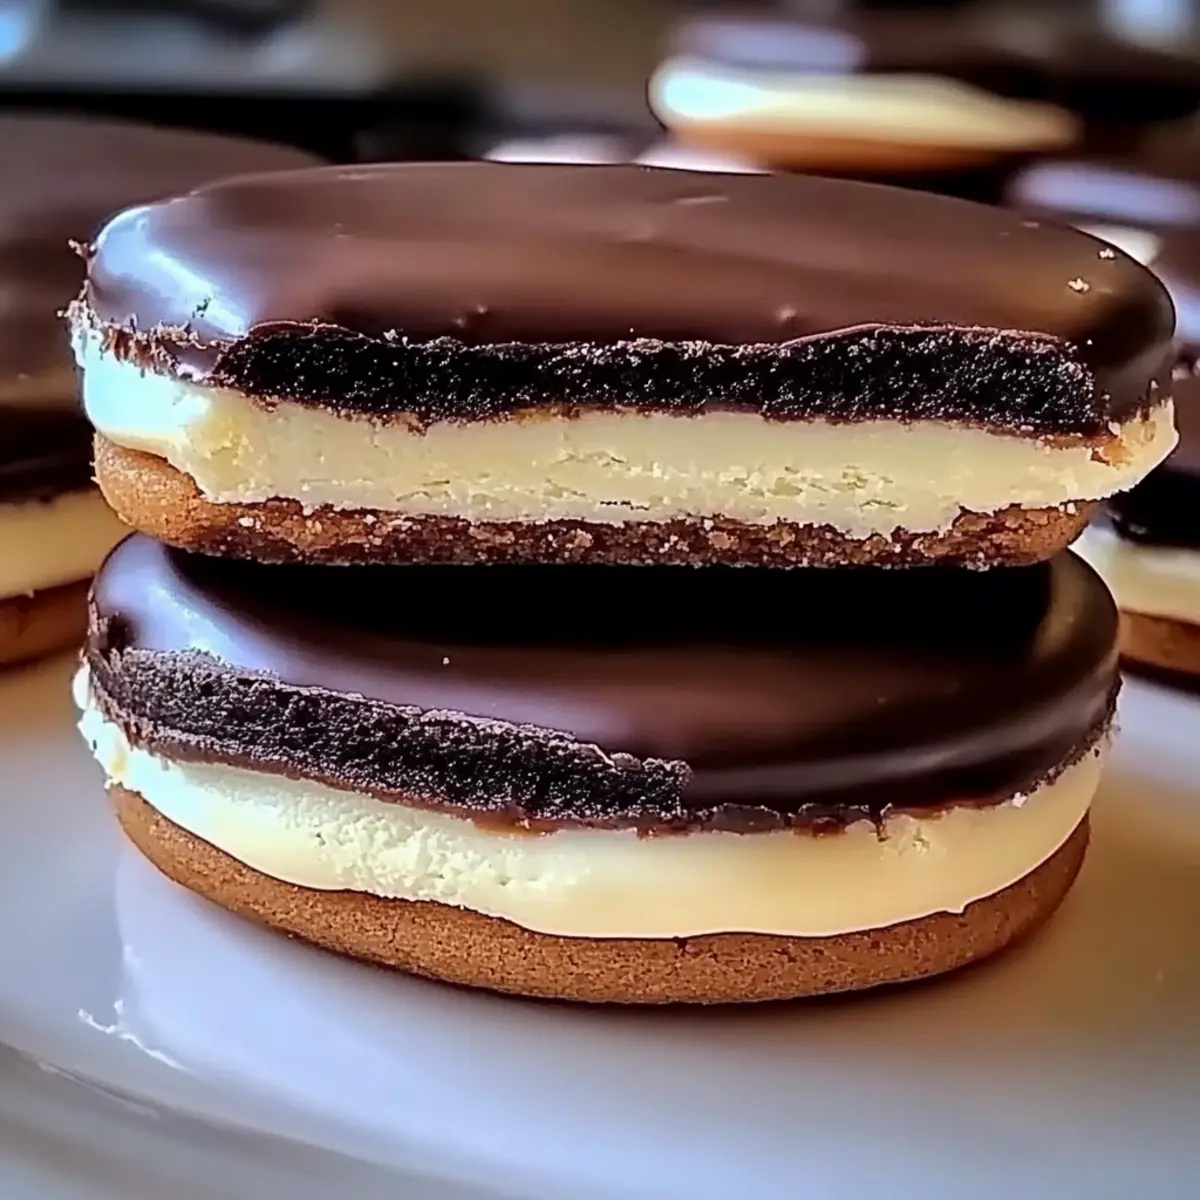
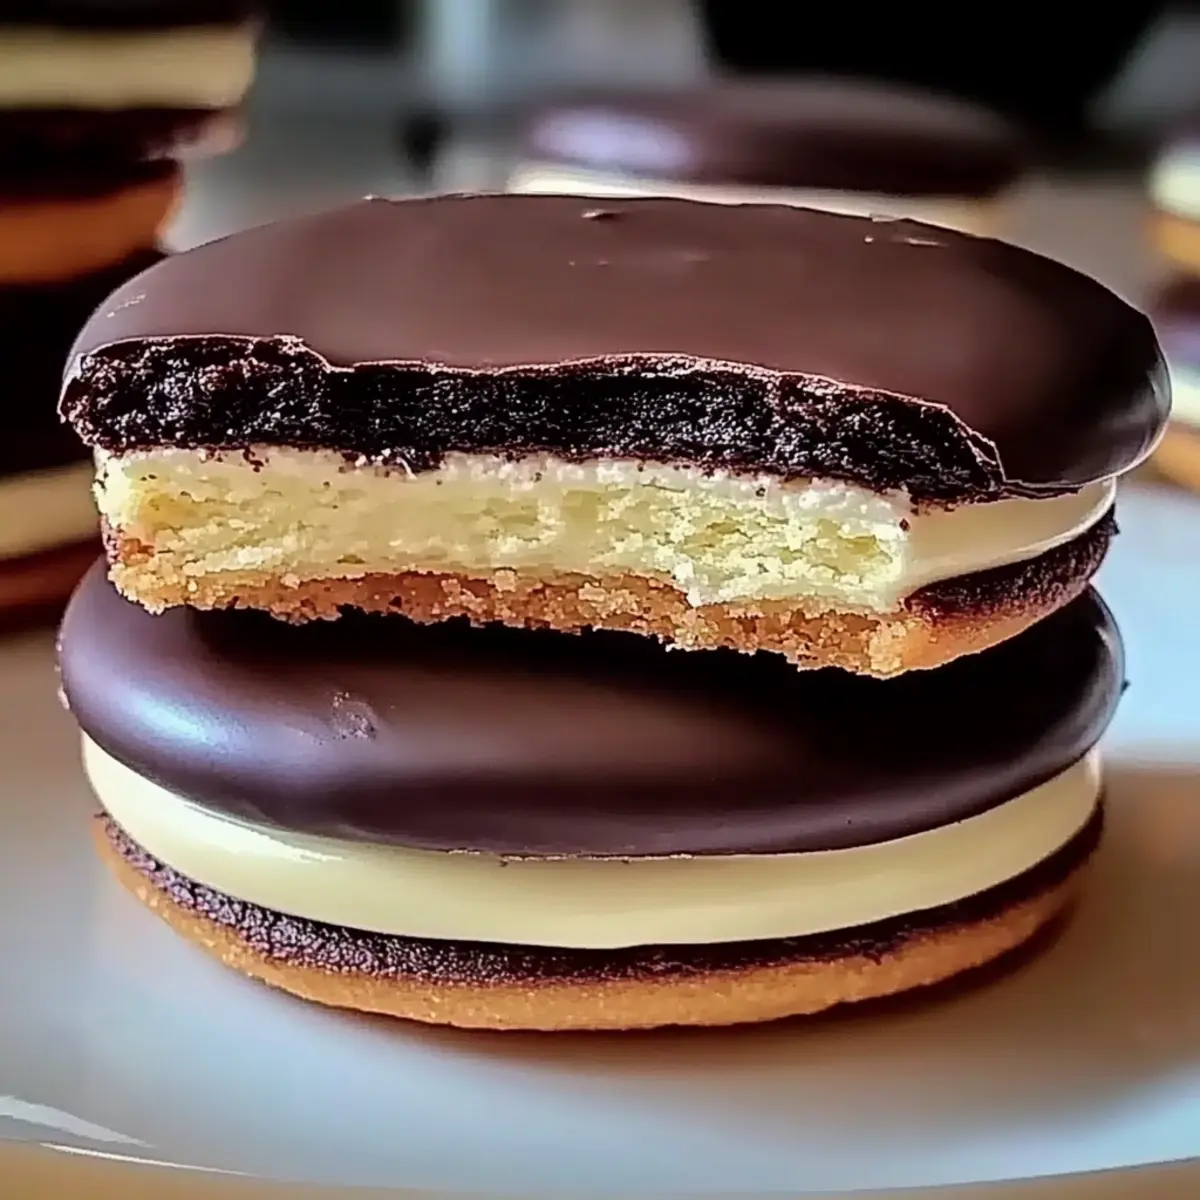
“Who wouldn’t want dessert for dinner?” I overheard my friend exclaim during a recent dinner party, and it reminded me just how much we all crave a little sweetness in our lives. Enter these delightful Boston Cream Pie Cookies—a whimsical twist on a classic dessert that packs all the familiar flavors into a small, handheld treat. They’re perfect for satisfying your sweet tooth with minimal fuss, taking just 42 minutes from start to finish. Plus, they’re an absolute crowd-pleaser, ideal for cookie platters or casual gatherings. Why settle for ordinary when you can indulge in something so cleverly delicious? Get ready to fill your kitchen with the irresistible aroma of cookies blending buttery goodness with a rich cream filling and luscious chocolate glaze. What’s not to love about that? Let’s dive into this irresistible recipe!
Why Are Boston Cream Pie Cookies Amazing?
Irresistible Flavor: The fusion of creamy filling and chocolate glaze delivers a burst of flavors that will leave your taste buds singing.
Quick and Easy: You can whip up these delicious treats in just 42 minutes, making them perfect for weeknight cravings or unexpected guests.
Versatile Choices: Swap the chocolate glaze for a white chocolate drizzle or add nuts to customize your cookie experience.
Crowd-Pleaser: These cookies are sure to impress at any gathering, whether you’re hosting a casual get-together or a more fancy dessert party.
Homemade Delight: There’s nothing like the sense of achievement from baking your own cookies without the tedious back-and-forth of traditional desserts like Pecan Cream Pie or fancy pastries.
Indulge today and discover why everyone is raving about these Boston Cream Pie Cookies!
Boston Cream Pie Cookies Ingredients
For the Cookie Base
• Unsalted Butter – Primary fat for flavor and moisture; substitute with margarine for a dairy-free option.
• Granulated Sugar – Sweetness and structure; can replace with coconut sugar for a lower glycemic index.
• Large Eggs – Provides moisture and binding; aquafaba can be used as a vegan substitute.
• Vanilla Extract – Adds warmth and depth of flavor; almond extract may be used for a unique profile.
• All-Purpose Flour – Provides structure; substitute with a gluten-free flour blend for gluten-free cookies.
• Baking Powder – Leavening agent for a light texture; baking soda could be used, but reduce the amount.
• Salt – Enhances flavor; omit if using salted butter.
For the Cream Filling
• Heavy Cream – Creates the filling’s richness; substitute with coconut cream for a vegan option.
• Powdered Sugar – Sweetens the cream filling; granulated sugar can be used, but it may affect texture.
For the Chocolate Glaze
• Semi-Sweet Chocolate Chips – Forms the chocolate glaze; dark chocolate can be substituted for a deeper flavor.
• Unsalted Butter (for glaze) – Adds richness to the glaze; can be omitted for a dairy-free version.
Indulge in these Boston Cream Pie Cookies that perfectly combine the flavors of a beloved dessert into a delightful treat!
Step‑by‑Step Instructions for Boston Cream Pie Cookies
Step 1: Preheat the Oven
Begin by preheating your oven to 350°F (175°C) to ensure a perfectly baked texture. While the oven heats up, prepare a baking sheet by lining it with parchment paper to prevent the cookies from sticking. This step is crucial for the foundation of your Boston Cream Pie Cookies!
Step 2: Cream the Ingredients
In a large mixing bowl, combine softened unsalted butter and granulated sugar. Use an electric mixer to beat them together on medium speed until the mixture is light and fluffy, typically about 3-5 minutes. This creaming process introduces air into the mixture, contributing to the cookies’ tender texture.
Step 3: Incorporate Eggs and Vanilla
Add in large eggs one at a time, mixing thoroughly after each addition. Once the eggs are fully incorporated, pour in the vanilla extract. Continue mixing on medium speed until everything is well blended and creamy, creating a rich base for your Boston Cream Pie Cookies.
Step 4: Prepare the Dry Ingredients
In a separate bowl, whisk together all-purpose flour, baking powder, and salt. This ensures an even distribution of the leavening agent throughout the flour. Once mixed, gradually add the dry ingredients to the wet mixture in the large bowl, stirring gently until just combined. Avoid overmixing to keep the cookies soft.
Step 5: Shape the Cookies
Using a tablespoon or cookie scoop, drop rounded portions of the cookie dough onto the prepared baking sheet. Make sure to leave about 2 inches of space between each dough ball to allow for spreading during baking. The dough should look slightly mounded and ready to bake to create those delightful, soft cookies.
Step 6: Bake the Cookies
Place the baking sheet in the preheated oven and bake for 15-20 minutes, or until the edges are lightly golden. Keep an eye on the cookies; they should be set but still soft in the center. Once done, remove the baking sheet from the oven and allow the cookies to cool on a wire rack.
Step 7: Prepare the Filling
While the cookies cool, it’s time to whip up the creamy filling. In a chilled mixing bowl, pour in heavy cream and add powdered sugar along with a splash of vanilla. Use an electric mixer to whip the cream on high speed until soft peaks form. This filling will add a luxurious and rich component to your Boston Cream Pie Cookies.
Step 8: Assemble the Cookies
Now that your cookies are completely cool, take half of them and pipe or spread the whipped cream filling onto the flat side. Gently place the remaining cookies on top, pressing down lightly to create a sandwich. You want this layer of delicious cream to be even and inviting for that classic Boston Cream Pie taste.
Step 9: Make the Glaze
In a microwave-safe bowl, combine semi-sweet chocolate chips and unsalted butter for the glaze. Microwave on high in 30-second intervals, stirring in between, until the mixture is completely smooth and combined. This glossy glaze will create a delightful finish on your cookies, enhancing their presentation and flavor.
Step 10: Glaze the Cookies
Finally, dip the tops of the filled cookies into the warm chocolate glaze, allowing any excess to drip back into the bowl. Place the glazed cookies back on the wire rack to set, which should only take a few minutes. Their vibrant chocolate glaze will harden slightly, completing your Boston Cream Pie Cookies beautifully.
What to Serve with Boston Cream Pie Cookies
These delightful cookies are not just a dessert but a perfect ending to any meal, inviting you to explore flavor pairings that complement their sweet, creamy charm.
- Rich Coffee: A bold cup of coffee balances the sweetness of the cookies, enhancing their creaminess while offering a cozy experience.
- Vanilla Ice Cream: A scoop of vanilla ice cream adds a refreshing and creamy contrast, making each bite feel like a luxurious treat.
- Fresh Berries: Juicy strawberries or raspberries provide a tart contrast, brightening the flavors and adding a refreshing touch to each cookie.
- Chocolate Milkshake: Indulge in a silky chocolate milkshake that harmonizes with the cookies, creating a blissful chocolate lover’s dream.
- Roasted Nuts: Salty roasted almonds or walnuts offer a crunchy texture, perfectly contrasting the soft cookies and creamy filling.
- Whipped Cream Topping: A dollop of extra whipped cream on the side boosts decadence and adds a delightful, airy lightness.
- Mint Tea: The refreshing notes of mint tea cleanse the palate, making a delightful pairing that adds a soothing touch.
- Chocolate Drizzle: For extra indulgence, drizzle some warm chocolate over the cookies before serving to intensify the chocolate experience.
Whether you opt for beverages or pairings, these choices can elevate your Boston Cream Pie Cookies moment, turning it into a delightful culinary experience.
Boston Cream Pie Cookies Variations & Substitutions
Feel free to get creative with your Boston Cream Pie Cookies and make them your own. Let your imagination run wild with these delicious twists!
-
Dairy-Free: Replace unsalted butter and heavy cream with vegan options like coconut oil and coconut cream for a delightful dairy-free treat. These changes will keep the richness while accommodating dietary preferences.
-
Gluten-Free: Use a gluten-free flour blend to make these cookies friendly for those avoiding gluten. The texture remains delightful, ensuring everyone can enjoy them without feeling left out!
-
Nutty Twist: Add chopped nuts like walnuts or pecans to the cream filling for added crunch. They’ll bring a delightful texture to every bite, enhancing the experience further.
-
Flavored Glaze: Swap the chocolate glaze for a white chocolate or caramel glaze to surprise your taste buds. Each type brings a new, luscious depth of flavor, inviting a delightful twist on the classic.
-
Fruit-Rich Filling: Incorporate a layer of fresh fruit preserves or jam with the cream filling. Biting into the creamy goodness coupled with fruity notes adds an exciting contrast that wakes up your palate!
-
Spicy Kick: Stir a pinch of cinnamon or cayenne pepper into the cream filling for a surprising kick. A dash of heat balances the sweetness perfectly, creating an unexpected harmony.
-
Mini Cookies: Bake smaller, bite-sized cookies for easy snacking. They’re perfect for parties and provide a satisfying sweet without overindulging. You can even serve them alongside a refreshing Italian Cream Soda for a delightful pairing!
-
Double-Decker: Create a double-layer cookie sandwich by adding an extra layer of cream filling between two cookies. The towering delight makes for an eye-catching presentation that will steal the show at any gathering.
Embrace the fun in customizing your Boston Cream Pie Cookies, and let each variation become an adventure for your taste buds!
Make Ahead Options
These Boston Cream Pie Cookies are perfect for meal prep enthusiasts! You can prepare the cookie dough up to 24 hours in advance by mixing the ingredients and refrigerating the dough, which helps the flavors meld beautifully. Additionally, you can whip the cream filling and store it in an airtight container in the fridge for up to 3 days. When you’re ready to serve, simply bake the cookies straight from the fridge, allow them to cool completely, and then fill them with the prepared cream. To maintain their delightful texture, avoid adding the chocolate glaze until serving, allowing you to enjoy fresh, just-glazed cookies that taste just as delicious as when they were first made.
Storage Tips for Boston Cream Pie Cookies
Fridge: Store fully assembled Boston Cream Pie Cookies in an airtight container for up to 3 days to maintain freshness and prevent sogginess.
Freezer: For longer storage, freeze unfilled cookies for up to 3 months. When ready to enjoy, thaw at room temperature, then fill with cream before serving.
Reheating: If you prefer warm cookies, gently microwave filled cookies for about 10-15 seconds. Be cautious not to heat too long, or the cream filling may become too runny.
Make-Ahead: You can bake the cookies in advance; just fill them shortly before serving to keep the cream filling fresh and delicious.
Expert Tips for Boston Cream Pie Cookies
-
Butter Softness: Make sure the unsalted butter is softened but not melted; this ensures you achieve a light, fluffy texture during the creaming process.
-
Cool Cookies First: Allow the cookies to cool completely before assembling with cream filling. This prevents the cream from melting and maintains the delightful texture.
-
Chocolate Variety: Experiment with different types of chocolate for the glaze! Whether you prefer semi-sweet, dark, or even white chocolate, each adds a unique flavor to your Boston Cream Pie Cookies.
-
Cream Filling Consistency: Whip the heavy cream until soft peaks form for the perfect filling. Overwhipping can result in a grainy texture, so keep an eye on it.
-
Proper Baking: Avoid overbaking! Aim for lightly golden edges, as the cookies will continue to set while cooling on the rack. This keeps them tender and soft.
-
Space Between Cookies: Leave enough space on the baking sheet when placing your dough balls to allow the cookies to spread evenly without sticking together.
Boston Cream Pie Cookies Recipe FAQs
What type of butter should I use for the cookies?
Absolutely! I recommend using unsalted butter for the best flavor and moisture. If you’re looking for a dairy-free option, margarine works as a suitable substitute. Just ensure it’s softened but not melted for the perfect creaming effect.
How should I store Boston Cream Pie Cookies?
To maintain freshness, store fully assembled cookies in an airtight container in the fridge for up to 3 days. This will help keep the cookies from becoming soggy and retain their delightful texture.
Can I freeze Boston Cream Pie Cookies?
Yes, indeed! For longer storage, you can freeze the unfilled cookies for up to 3 months. Just place them in a single layer in a freezer-safe container. When you’re ready to enjoy, thaw them at room temperature and then fill with the cream before serving to ensure they taste fresh and delightful.
What if my cream filling turns out too runny?
If your cream filling is too runny, it’s likely that the heavy cream wasn’t whipped enough. Make sure to whip the cream until soft peaks form—this takes about 2-3 minutes on high speed. If overwhipped, it can become grainy, so keep a close eye on it as you whip. Next time, chill your mixing bowl and beaters for a couple of minutes before whipping as that can help it reach the right consistency.
Can I use a different type of chocolate for the glaze?
Very much so! You can switch up the chocolate by using dark or white chocolate, depending on your taste preference. Just remember to follow the melting instructions carefully for a smooth glaze—and let that chocolatey goodness bring out all the flavors of the Boston Cream Pie Cookies!
Are Boston Cream Pie Cookies suitable for dietary restrictions?
Absolutely! If you’re catering to different dietary needs, you can make certain substitutions. For a dairy-free version, use margarine in the cookie base and coconut cream for the filling. You can also use aquafaba instead of eggs for a vegan option, ensuring everyone can enjoy these delectable treats!

Boston Cream Pie Cookies: Your New Favorite Sweet Delight
Ingredients
Equipment
Method
- Preheat your oven to 350°F (175°C) and prepare a baking sheet with parchment paper.
- In a large mixing bowl, cream together softened unsalted butter and granulated sugar until light and fluffy (about 3-5 minutes).
- Incorporate eggs one at a time, mixing thoroughly after each addition, then add the vanilla extract and continue mixing.
- In a separate bowl, whisk together all-purpose flour, baking powder, and salt. Gradually add the dry mixture to the wet mixture until just combined.
- Drop rounded portions of the cookie dough onto the baking sheet, leaving about 2 inches of space between each ball.
- Bake for 15-20 minutes or until edges are lightly golden. Remove from oven and allow to cool on a wire rack.
- In a chilled mixing bowl, whip heavy cream and powdered sugar until soft peaks form for the filling.
- Take half of the cooled cookies and pipe or spread the whipped cream filling on the flat side, then top with the remaining cookies.
- In a microwave-safe bowl, combine chocolate chips and unsalted butter for the glaze. Microwave in 30-second intervals until smooth.
- Dip the tops of the filled cookies into the warm chocolate glaze, allowing excess to drip back, then set on the wire rack to harden.
Leave a Reply